
The Ultimate Guide to Finger Independence: The Easy Method to Massively Improve Your Guitar Speed and Fluency
The better your finger independence, the better you can play anything ...

So you’re learning a new chord, and for some reason you just can’t get your fingers to move into the right place. Every time you use that chord your fingers knot up, and it seems impossible to play it cleanly.
Or let’s say you’re learning a fast part in a new solo, and once you get to a certain tempo your fingers just freeze and tense up. No matter how much practice you do, you just can’t get faster.
Both of these problems – and many more – are caused by a lack of finger independence.
“Finger independence” is your ability to move your fingers independently of each other, without the movement of one finger impacting the others.
For instance, if you have poor finger independence then you’ll struggle to use your little finger, and you’ll find it difficult to do large stretches or play fast runs. Learning new songs will also take ages, and it’ll always seem like a struggle.
Playing guitar with poor finger independence feels hard.
If your finger independence is good, though, then everything is easier to play. You can learn new songs and solos really quickly, and playing the guitar looks and feels effortless.
Playing fast isn’t any harder than playing slow, and you can use all four fingers with ease. When you’ve got good finger independence, you’re one of those players that people look at and go “wow! They make it look so easy!”
That’s because it is easy . If you train your fingers to move independently then playing the guitar becomes effortless.
Doing this is NOT down to talent. Even if you’ve got the shortest, fattest fingers in existence, you can still get good finger independence with just a bit of practice.
Even the classical maestro Andres Segovia had stubby fingers, and yet he was a virtuoso.
The size and shape of your fingers doesn’t make a difference – it’s the way you play and the way you practice that’s important.
Don’t worry about your fingers, or your age, or anything else – that stuff doesn’t make a difference. Focus on training your fingers to work for you!
Let’s get started then!
To download the free 4-Week Finger Independence Mastery Course, featuring a tried-and-tested ironclad practice strategy you can use to master finger independence and massively improve your playing, Go Here.
Making Everything Easier - Getting an Ironclad Foundation
First we’re gonna look at how you move your hands. This is 80% of the battle.
If you’ve got good technique – i.e. you’re using the right finger for the job, your thumb is in the right place, and so on – everything will be a breeze.
Let’s start with thumb position.
Here’s how most people position their thumbs:
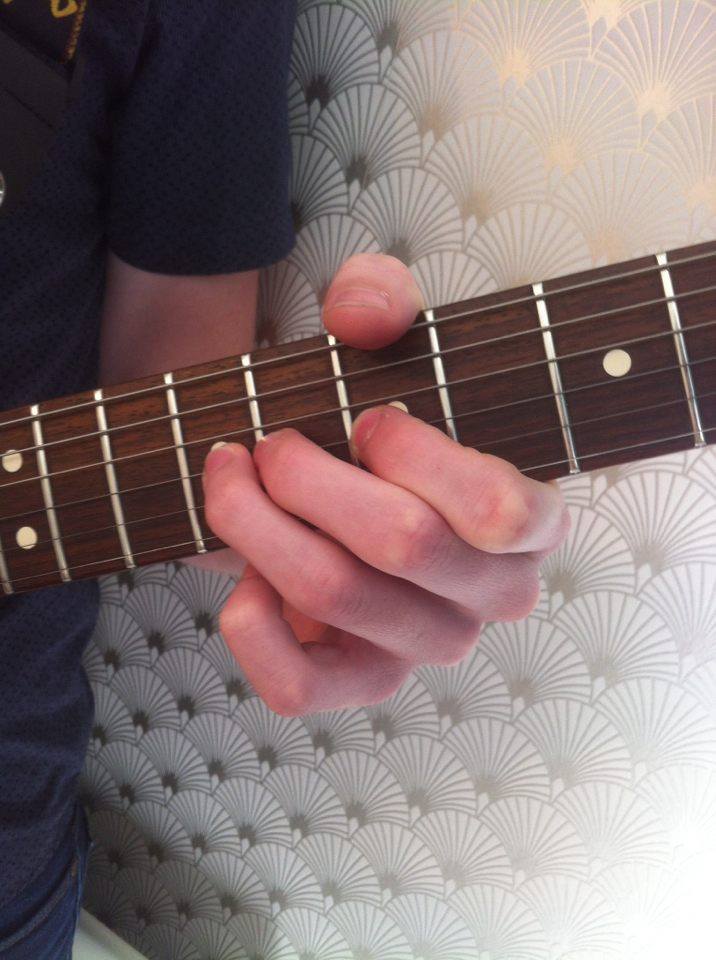
It’s over the top of the neck. This is supposed to give more control for bending, but it actually hinders you .
The angle makes it awkward for your fingers to move fluently. Instead, try this:
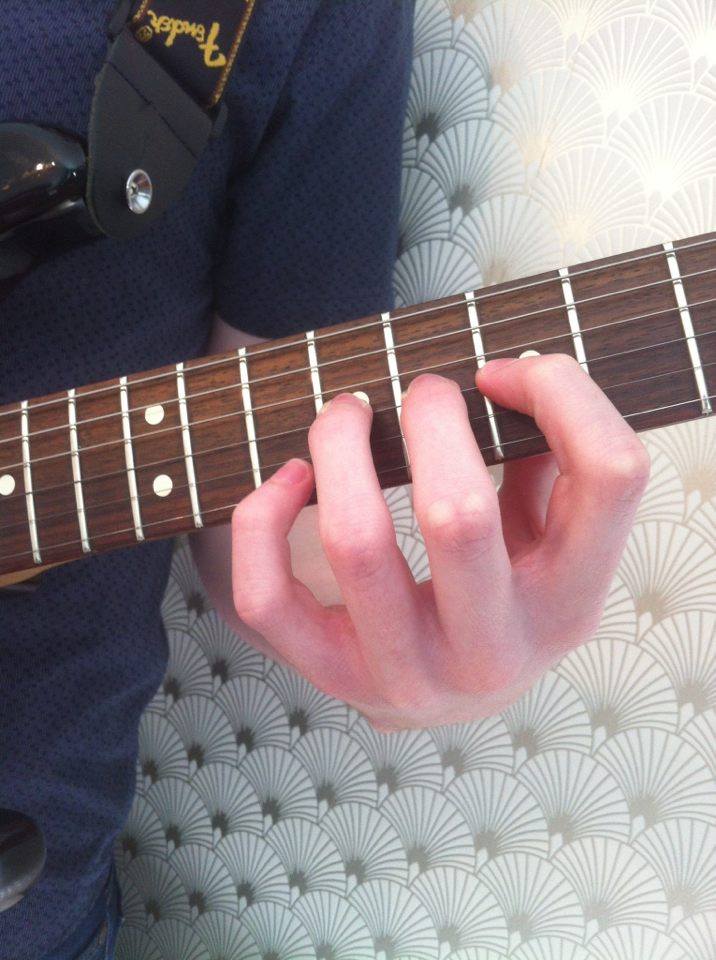
Now the thumb is behind the neck. This makes it easier to move your fingers independently because you can keep your fingers parallel to the frets.
Try it out. At first bending might feel a bit awkward, but that’s only because you’re used to the other “thumb-over-the-neck” position.
With a bit of practice this new position becomes much, much easier.
Now we’ll deal with the fingers.
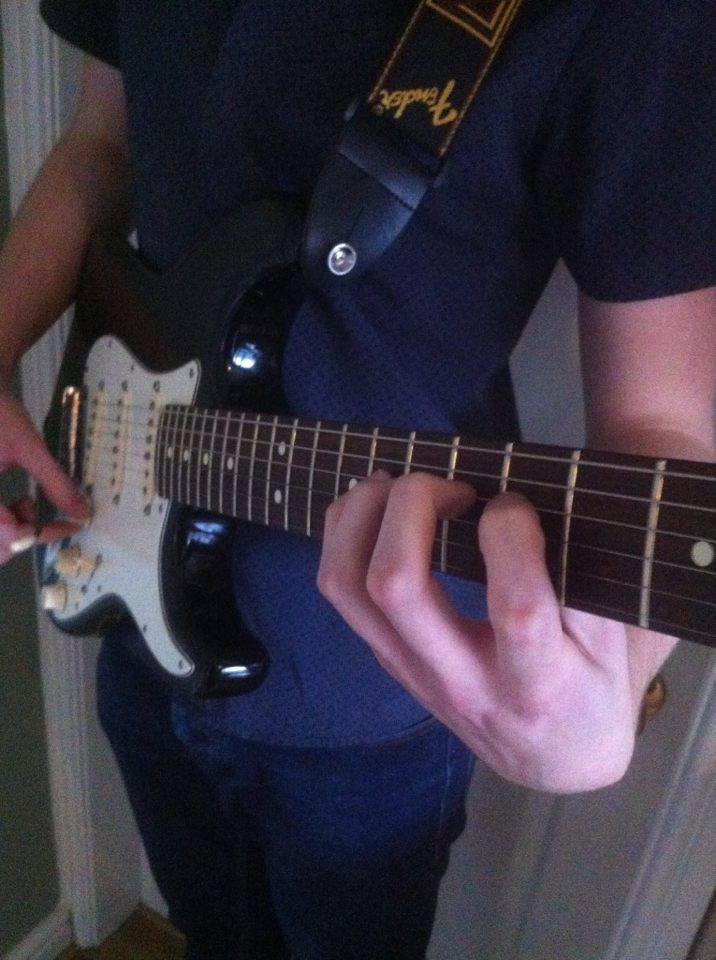
When you play, keep your fingers close to the fret wire of the fret that you’re playing. For instance, if you’re playing on the 1st fret then don’t just plonk your finger anywhere in that fret gap – put it right next to the 1st fret wire.
Here’s a photo higher up the neck to show you what I mean:
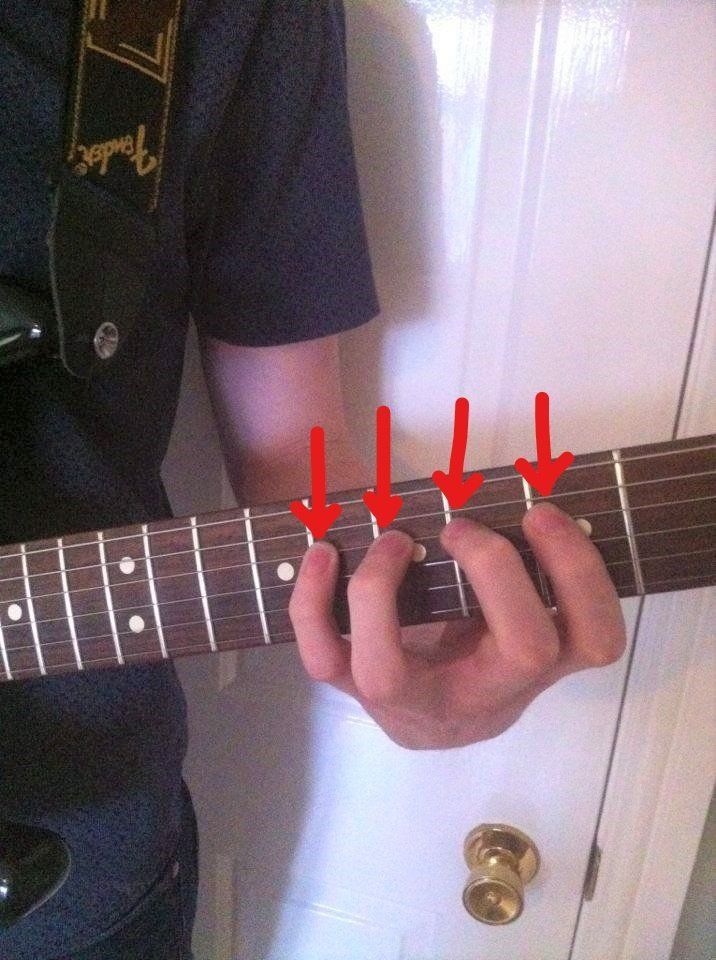
This makes it easier to press the string down, meaning you don’t have to put in as much effort.
Next, a word about the force you use. The less physical force you use when you play, the easier it’ll be. Try to use only a minimum of force when you press down a note – no more!
See how lightly you can play. How lightly can you press down a note and still get it to ring out clearly?
Make sure that your last finger joint doesn’t bend back on itself, like this:
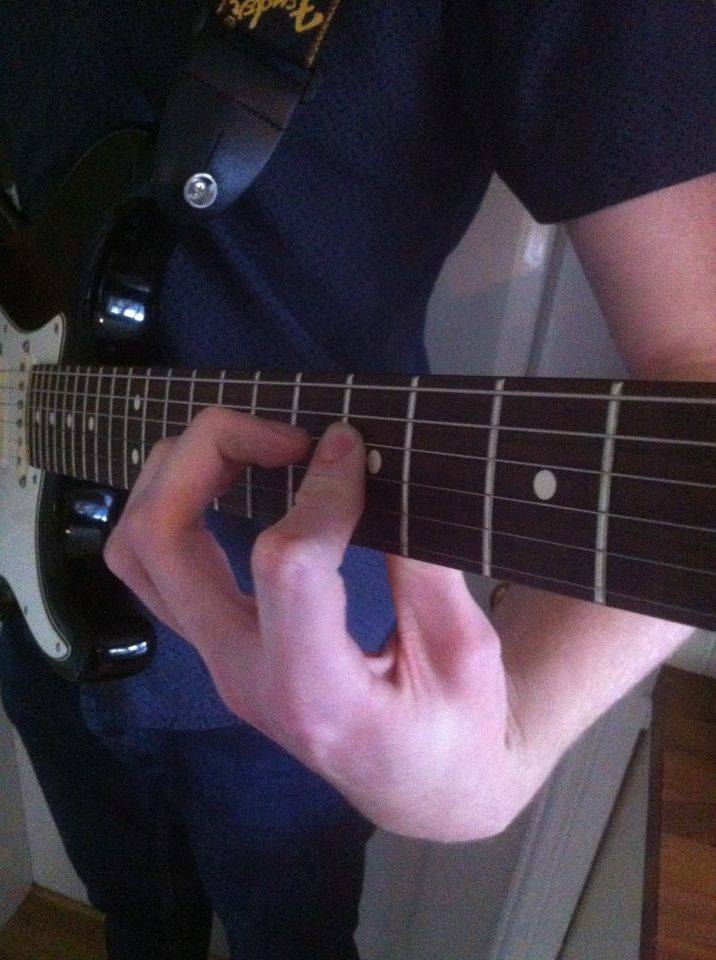
That’s a sure sign of poor technique and too much force. Instead, keep your fingers neatly curled like this:
For more on finger strength and why playing lightly is best, check out this article.
Now we’re gonna talk about fingerings.
The fingering you use when playing scales, licks and songs makes a massive difference to the difficulty of what you’re playing.
My main piece of advice is to stick to one finger per fret where possible. If you’re playing notes on the 5th, 7th and 8th frets, for example, then don’t use your 1st, 2nd and 3rd fingers – use your 1st, 3rd and 4th fingers.
Use that pinky! Just because it’s small, it doesn’t mean it isn’t useful.
It’s easily strong enough for guitar; you just need to get used to it. Soon it’ll be as easy to use as all of your other fingers.
For stretching, again make sure that your thumb is behind the neck and that you’re using your little finger. This will make stretching way easier – then it’s just a matter of practice.
How to Master Finger Independence Fast
Now you know how to move your fingers properly, we’re gonna do some cool exercises and “games”.
They’re all specifically designed to focus on the most common problems people have with finger independence, so that you can get fast results.
The way to master this quickly is to focus on the things that you find most difficult.
More on that in a moment. First, a word on how to practice.
STAY RELAXED. Playing relaxed and slow is 1,000,000x better than playing tense and fast.
Focus on making it feel easy, and you’ll get good results.
Effortlessness is the goal. Forget about speed for a moment and just focus on ease.
Then, speed will come automatically.
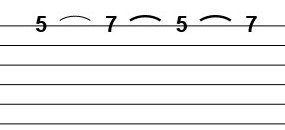
This first exercise uses a “trill” – where you alternate between two notes over and over again.

Try it with the following finger combinations:
1+2
2+3
3+4
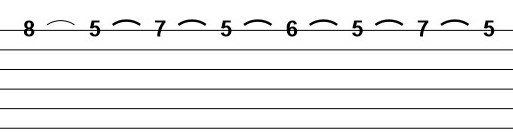
Then try the next exercise. This is the same, but with an extra fret in the middle.
Try it with the following finger combinations:
1+3
2+4
1+2
3+4
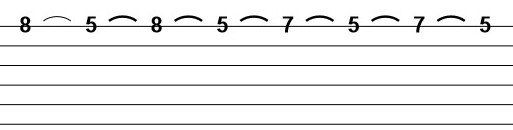
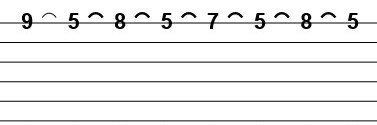
Now we have one final trill exercise, with two frets between the trilled notes:

For this one, just use your 1st and 4th fingers.
If any one of those exercises or finger combinations feels more difficult than the others, focus extra time on that .
Make it your focus for a week, and see what results you get (see the free “ 4 Week Finger Independence Mastery Course ” for more info).
This is THE WAY to get really good finger independence in a short space of time.
Most people find the 3+4 combos the most difficult – if that’s the case, make sure to devote extra time to them.
This way, you’re focusing on the main thing that’s holding you back. You’ll get far better results this way because you’re focusing on the thing that you’re worst at.
Soon that’ll turn into one of the things you’re really, really good at!
Remember to move these exercises around, too. Do them on different strings and frets, and try them out all over the neck.
This will make sure you can use your new skills in any situation, which’ll make you a much more versatile player.
To make practising this stuff more fun, try playing some “games” with the exercises. Here are a few ideas:
- How many times can you play the trill perfectly
in a row? 10? 20? Count, and then write it down. Then, every time you practice,
try to beat your “high score”!
- See if you can play the trill pattern correctly
five times on every single fret – right up the neck! Start at the first fret
and work your way up, one fret at a time. How high can you go before you make a
mistake?
- Try playing the trill pattern really quietly,
and then really loudly. Remember: even when you’re playing loud, you can still stay relaxed
by making sure that
you relax
between every note.
Experiment with dynamics – can you play the
trills loud and clear on an unplugged electric guitar? If so, your technique is
really solid!
Games are great for making practice more fun. After all, fun is the reason we play guitar in the first place – so if it isn’t fun, it isn’t worth it!
These trills might seem really basic, but everything you play on guitar is made up of some combination of these. Get good at them, and you’ll be surprised how easy everything becomes.
The Next Level
Now we’re gonna move on to some “combo” exercises.
These are a bit more challenging because they combine the trills we’ve already learned.
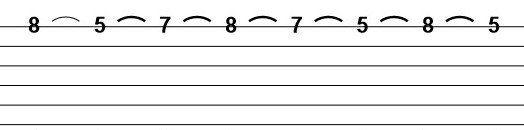
The first one is a basic combination of the exercises we’ve done so far. The fingering is 4-1-3-1-2-1-3-1.
The challenge here is putting it all together .
The previous exercises have trained you to use your fingers well in isolation; now we’re combining them and using them together.
This is the real “final goal” of finger independence exercises – to be able to use your fingers in any combination easily. This will massively improve your musical abilities.
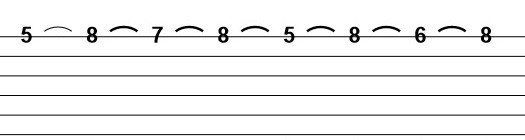
The next exercise focuses on using your 3rd and 4th fingers more; the fingering is 4-1-4-1-3-1-3-1.
The third and fourth fingers actually share some tendons in the hand, which is why they can be difficult to move independently.
By practising the right kind of exercises, though (like the one above), you can quickly overcome this and unlock a whole new level of freedom on the guitar.
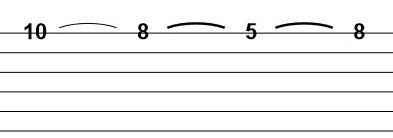
Now we have another 3-4 exercise. This one is a little more difficult, but with a bit of practice it’ll soon become easy.
The fingering here is 4-1-3-4-3-1-4-1.
If you practise that exercise until it’s really easy, you’ll be able to play loads of cool shred runs and ideas without much trouble.
The better your finger independence, the faster you can play.
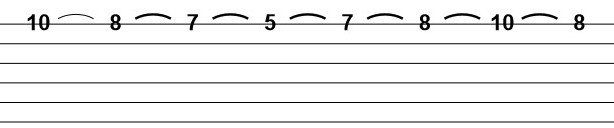
We have one more exercise in this section before we move on to the advanced stuff.
This one uses all four fingers – if you can play this well, you’ve got really solid skills.
The fingering is 1-4-3-4-1-4-2-4; it’s basically the same pattern repeated – once with the third finger, and once with the second finger.
Before you move on to the next section, make sure you’re really good at these exercises. Sit in front of the TV as you do them, if you like, and rack up thousands of repetitions.
Remember to move them around to different positions and strings, too – play them everywhere on the neck!
The better you are at these, the better you’ll be at the advanced exercises coming up next.
Complete Mastery - Advanced Exercises
This is where we do some really cool stretching patterns to push your abilities to the next level!
Doing the exercises so far has been good, but if you want to completely master the challenge then you have to go further.
If you want skills that are really reliable, you need to practise exercises that are harder than what you normally play.
Then, when you’re playing at a gig or rehearsal everything will be really easy, because you’ve been practising things that are much harder than what you’re playing.
Need to stretch four frets for a song? Learn to stretch by five, or even six frets! Then even if you’re really nervous, your hands are sweaty, or if you’re distracted, you can still pull off the song no problem.
It’s like a “safety net” of technique.
Take your skills way beyond where you’ll normally need them, and you’ll have really reliable technique that’ll never let you down.
The first of these “advanced” exercises involves a stretch from the 5th to the 10th frets! Take it very slow, and do short practice sessions of just a few minutes at first. Don’t over-work your hands, or you risk injuring yourself.
The fingering is 4-3-1-3. If you feel any pain whatsoever, STOP IMMEDIATELY.
This isn’t weightlifting. Pain isn’t a sign that you’ve worked your hands, it’s a sign that you could injure yourself.
To play guitar well you don’t need finger strength. You need relaxed control.
Play slow and relaxed, and you’ll be a much better player.
Now we have a real finger-twister! This is a four-finger exercise, again involving a hefty stretch:
The fingering is 4-3-2-1-2-3-4-3. Forget about speed on this one – the purpose is just to train your fingers to work together better.
Then, speed will develop all by itself.
The next exercise is the same as the first “combo”, only we’ve added an extra fret between the 1st and 2nd fingers.
The fingering is 4-1-3-1-2-1-3-1.
The stretch is only from the 5th to the 9th fret (rather than 5th to 10th like in the last two exercises), so the challenge is more in the accuracy of your fingers.
You can move these exercises around, too. Try moving them up the neck one fret at a time, or repeating them once on each string.
Here’s an example:

Take it across all of the strings; can you do it without making a single mistake? Challenge yourself!
How to Practise Away From Your Guitar – And Get Amazing Results in Record Time
So you know how to practise finger independence, you know how to best position your hands, and you’ve got some great exercises to improve your skills.
Now we’re gonna go through some really cool ways you can practise without your guitar – at work, on the school bus, or even while out shopping.
Finger independence is all about training your fingers to work together effectively.
It’s not exclusive to guitar players – violinists, pianists, bassists, and a whole load of other people also need good finger independence.
What this means is that it’s a general skill. If it’s not exclusive to guitar, then you don’t need a guitar to practise it.
You can practise moving your fingers wherever you are. All you need is your hands and a flat surface.
A table will do, but if you’re walking around then you can just use the side of your leg, where your hand is when you’ve got your arms by your sides.
Then, you practise moving your fingers in different combinations. Tap them down one after another, focusing on getting the timing even and keeping your hand relaxed.
Here are some combos you could try:
1-2-3-4-3-2-1
1-4-3-2
1-4-3-4
4-1-3-1-2-1-3-1
And many more. In fact, you could use the fingering from pretty much any lick to practise this; it’s all about learning to move your fingers independently from each other.
You don’t need a guitar, you don’t need strings, in fact – you don’t even need an instrument!
You just need your hands. Then, you can practise away.
Do this every day on your morning bus ride or train journey (not if you’re driving in your car! Don’t distract yourself from the road, obviously), and whenever you’re sat at a desk at work, and you can build amazing skills really quickly.
You can get hours of finger independence practise done without really trying. Combine this with just a small amount of daily practise on the guitar exercises from before, and you’ll be surprised how quickly you get results.
It’s easy!
Final Thoughts
So there we have it – the complete guide to finger independence. Follow it and you’ll massively improve your abilities as a player.
Finger independence is the foundation for loads of guitar skills, so regardless of what genre of music you’re into it’s vital that you practise it regularly.
To help you do just that I’ve put together a “ 4-Week Finger Independence Mastery Course ”, featuring a tried-and-tested ironclad practice strategy you can use to master finger independence and massively improve your playing.
It’s based on the super-effective exercises in this article, so if you want to level-up your technique and power-up your playing, check it out (it’s completely free)!
As always, thanks for reading, and feel free to ask any questions you might have by going to www.tomguitar.co.uk/contact.
Have fun, and keep rocking!