
12 Alternate Picking Exercises: Individual Skill Focus with Tabs and Close-Ups
- by Tom Boddison
- •
- 13 Feb, 2018
12 Exercises to Master The Most Important Parts of Fast Alternate Picking
Alternate Picking - More Than Just One Skill
Alternate picking is pretty simple - you just move your pick down, then up, then down, then up...
...and so on, right?
Easy?
Well.
Sure, it's simple on the surface, but if you want to master it FAST then you need to understand that there's more going on than just down, up, down, up.
There are lots of challenges that you need to master one by one in order to play fast alternate picking licks. These 12 exercises focus on the specific problem areas that everyone encounters when they learn to alternate pick at high speed.
The Main Challenges of Alternate Picking
We're gonna focus on four main skills that you need to master. Here they are:
There are more challenges than these, but these are the main ones we'll focus on today.
- Tremolo Picking - picking one note repeatedly to get used to correct picking technique.
- Synchronising The Hands - making sure your hands both hit the notes at exactly the same time. This makes sure your playing sounds clean and precise, which is what enables you to play fast.
- Changing Strings After Upstrokes
- we're dividing string changes into two separate categories to break down the challenge and learn it faster. First we're gonna learn to change strings with the last note
on each string being an upstroke, leading to a downstroke as the first note on the new string.
- Changing Strings After Downstrokes
- now we're gonna do the opposite, and learn to change strings with the last note
on each string being a downstroke, leading to an upstroke
as the first note on the new string.
There are more challenges than these, but these are the main ones we'll focus on today.
How to Boost Your Picking Speed by 50%
When you're learning alternate picking it's vital that you not only use the right exercises
but also avoid the common pitfalls.
That's why I created this free guide to help you avoid the seven most common mistakes people make when learning alternate picking:
That's why I created this free guide to help you avoid the seven most common mistakes people make when learning alternate picking:

If you avoid all of the pitfalls, you'll get fast - it's that simple!
If you're making these mistakes (which you probably are - I made them for years!) then you'll find it really difficult to play fast. Fix these mistakes, and you'll increase your potential speed by at least 50%, if not more!
Check out the free guide HERE and start alternate picking the RIGHT way!
If you're making these mistakes (which you probably are - I made them for years!) then you'll find it really difficult to play fast. Fix these mistakes, and you'll increase your potential speed by at least 50%, if not more!
Check out the free guide HERE and start alternate picking the RIGHT way!
Stage 1: Tremolo Picking (DO NOT SKIP THIS!)
Even if you think you're already good at this, DO NOT SKIP THESE EXERCISES!
It's really important that you get completely comfortable with this skill before continuing. Even if you've been practising your picking for a while, it doesn't mean that you won't benefit from these tremolo picking exercises.
The idea here is that the left hand parts are really simple, letting you focus completely on getting your right hand technique correct (i.e. relaxed and controlled).
Here's the first one. It's an E minor scale going down the strings (all the exercises in stages 1 and 2 are in the key of E minor).
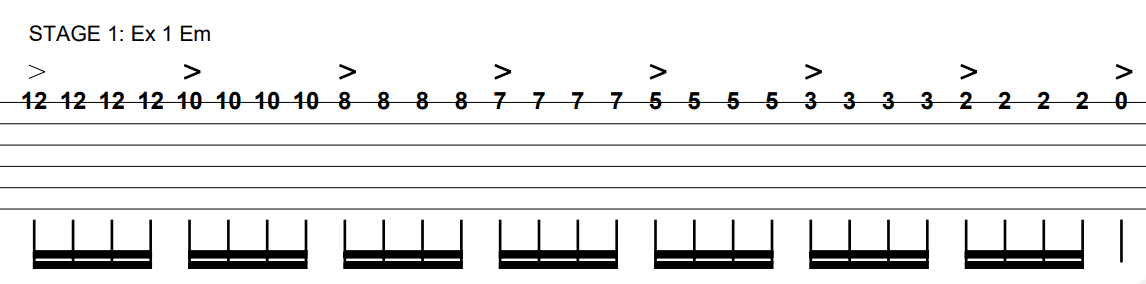
You'll notice the little triangle symbols above some of the notes - if you haven't seen these before, they are accents. This means that you should play those notes slightly louder than the rest.
Just pick them a tiny bit harder than the others. These accents will line up with the beat if you're playing to a metronome, which will help you to keep in time and keep track of what you are playing.
They're also a vital part of synchronising the hands together later on (you'll see why in a moment).
Here's the next exercise. Now we're accenting every sixth note, which gives a slightly different feel.
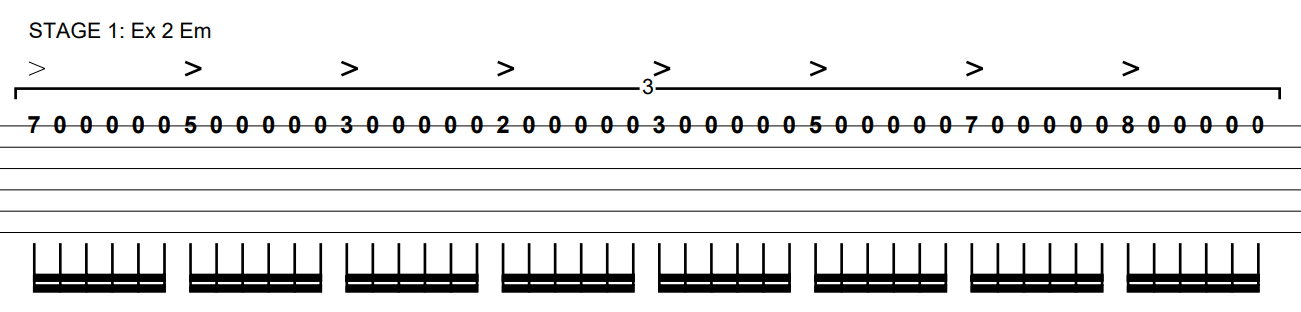
You'll notice that instead of holding each note down (like we did in the first exercise), we're now only holding our fretting hand finger down for one note before releasing it again and then picking the open note.
This helps you improve picking hand control because it feels different when you pick the open string as opposed to picking a fretted note.
This is because there's a slight difference in string tension, so this exercise will get you used to that sensation and help you to improve your control. It's a great exercise for eliminating picking "hang-ups", where the pick gets caught on the string when you go to play it (learn how to get rid of picking hang-ups once and for all here).
Now we've got the final tremolo picking example:
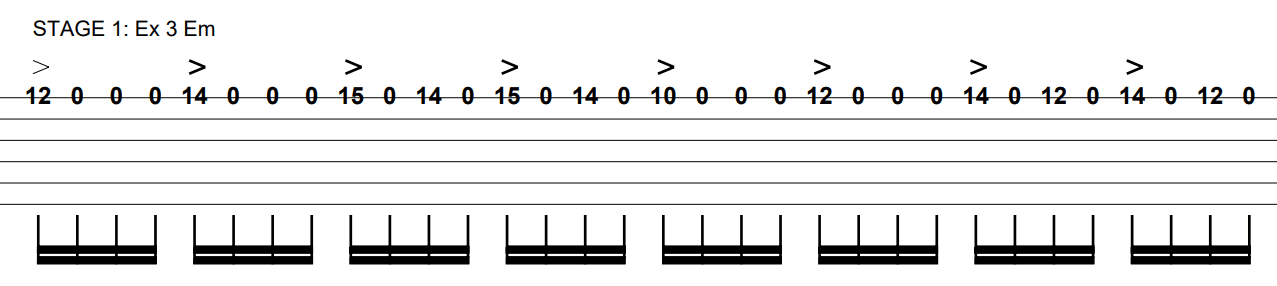
As you can see, in this exercise the fretting hand is a bit more involved than in the previous two.
This brings in a little bit of a challenge with synchronising the hands together and making sure that they both hit the notes at the same time. However, it's still quite easy because we're only fretting (at most) every other note.
You could view this exercise as a "preview" of the next section! Practice it, master it, and then move on to the next set of exercises...
Stage 2: Synchronising The Hands
Synchronising your hands together so that they both hit the notes at exactly the same time is a VITAL part of fast picking, but it can be a nightmare to get right!
After all, when the notes are going by so quickly, it's nigh on impossible to keep track of which hand is doing what and make sure that they're both in time with each other.
The faster you play, the smaller the margin of error is - so when you're shredding, there's no room AT ALL for any discrepancy in timing between the two hands.
However, there is an easy way to get around this...
...which is by using the accents from stage 1.
So far you've learned to tremolo pick on one string while playing the first note of each beat slightly louder than the rest.
When you start to synchronise your hands together, this note acts like your "focus point" or "lock point". All you have to do is focus on that note, and with a bit of practice the notes in between will sort themselves out.
When you practice, make sure that you focus on making the accented note PERFECTLY IN TIME. Make sure both hands are perfectly in sync for that note.
Then, you can forget about the other notes. After playing a few notes your hands might start to drift apart again and go out of time...
...but just before that happens, another accent comes around where you sync them right back up again!
If you get used to using accents like this, synchronisation won't be a problem. Just focus on getting the ACCENTS right, and every other note will sort itself out!
Concentrate on this as you practice the next few exercises. Here's the first one for this section:
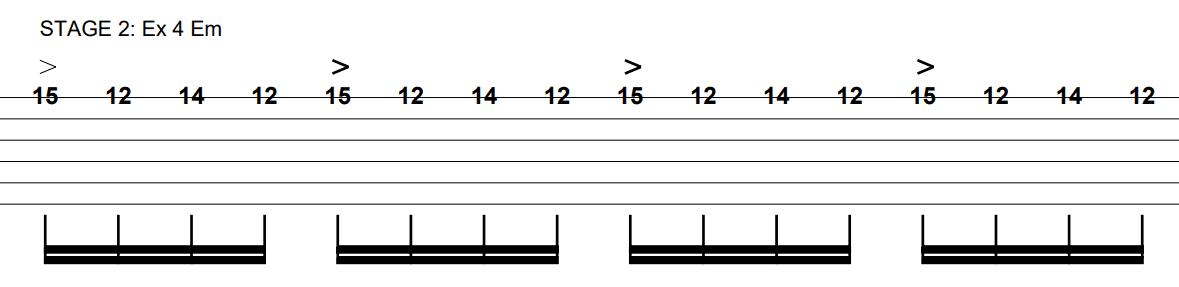
As you can see, we're accenting the first note of each beat again. Just focus on playing that note perfectly in sync, and the other notes will sort themselves out automatically when you get faster.
Here's the next exercise:
Here's the next exercise:
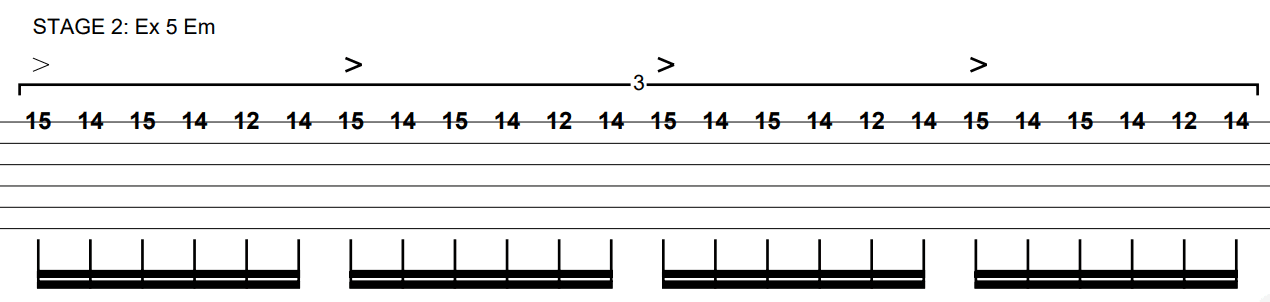
If you play this lick with your 1st, 3rd and 4th fingers, then it's great for working on your 3rd/4th finger independence.
This is something that a LOT of guitarists struggle with, so give that exercise a go to combat it.
Then move on to this one:
This is something that a LOT of guitarists struggle with, so give that exercise a go to combat it.
Then move on to this one:
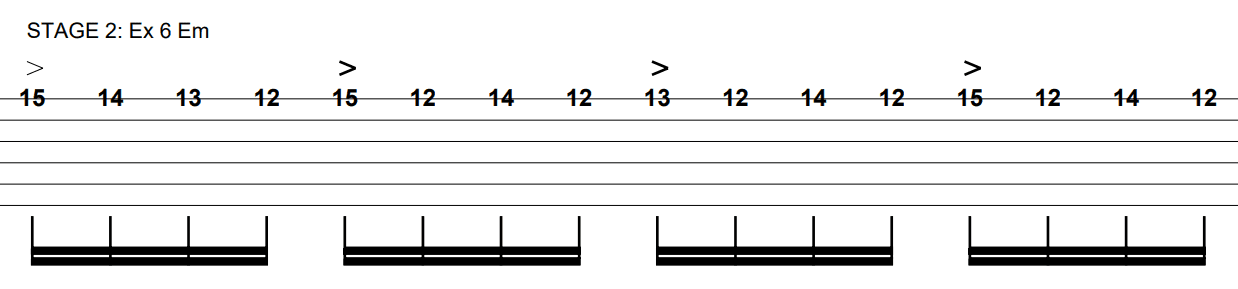
This exercise is actually chromatic rather than E minor, but you can use it over E minor use the note on the 13th fret as a passing tone.
It's great for synchronisation because it works on using all four fingers while picking. This trains your finger independence at the same time!
Once you've got a hold on those exercises, you're ready for the next challenge - changing strings...
It's great for synchronisation because it works on using all four fingers while picking. This trains your finger independence at the same time!
Once you've got a hold on those exercises, you're ready for the next challenge - changing strings...
Stage 3: Changing Strings After Upstrokes
Now you've got your single string picking technique sorted, it's time to learn about string changing.
We'll start by focusing on just one type of string change: making each string start on a downstroke and end on an upstroke.
We can make this easy for ourselves by using the "pick-slanting" technique.
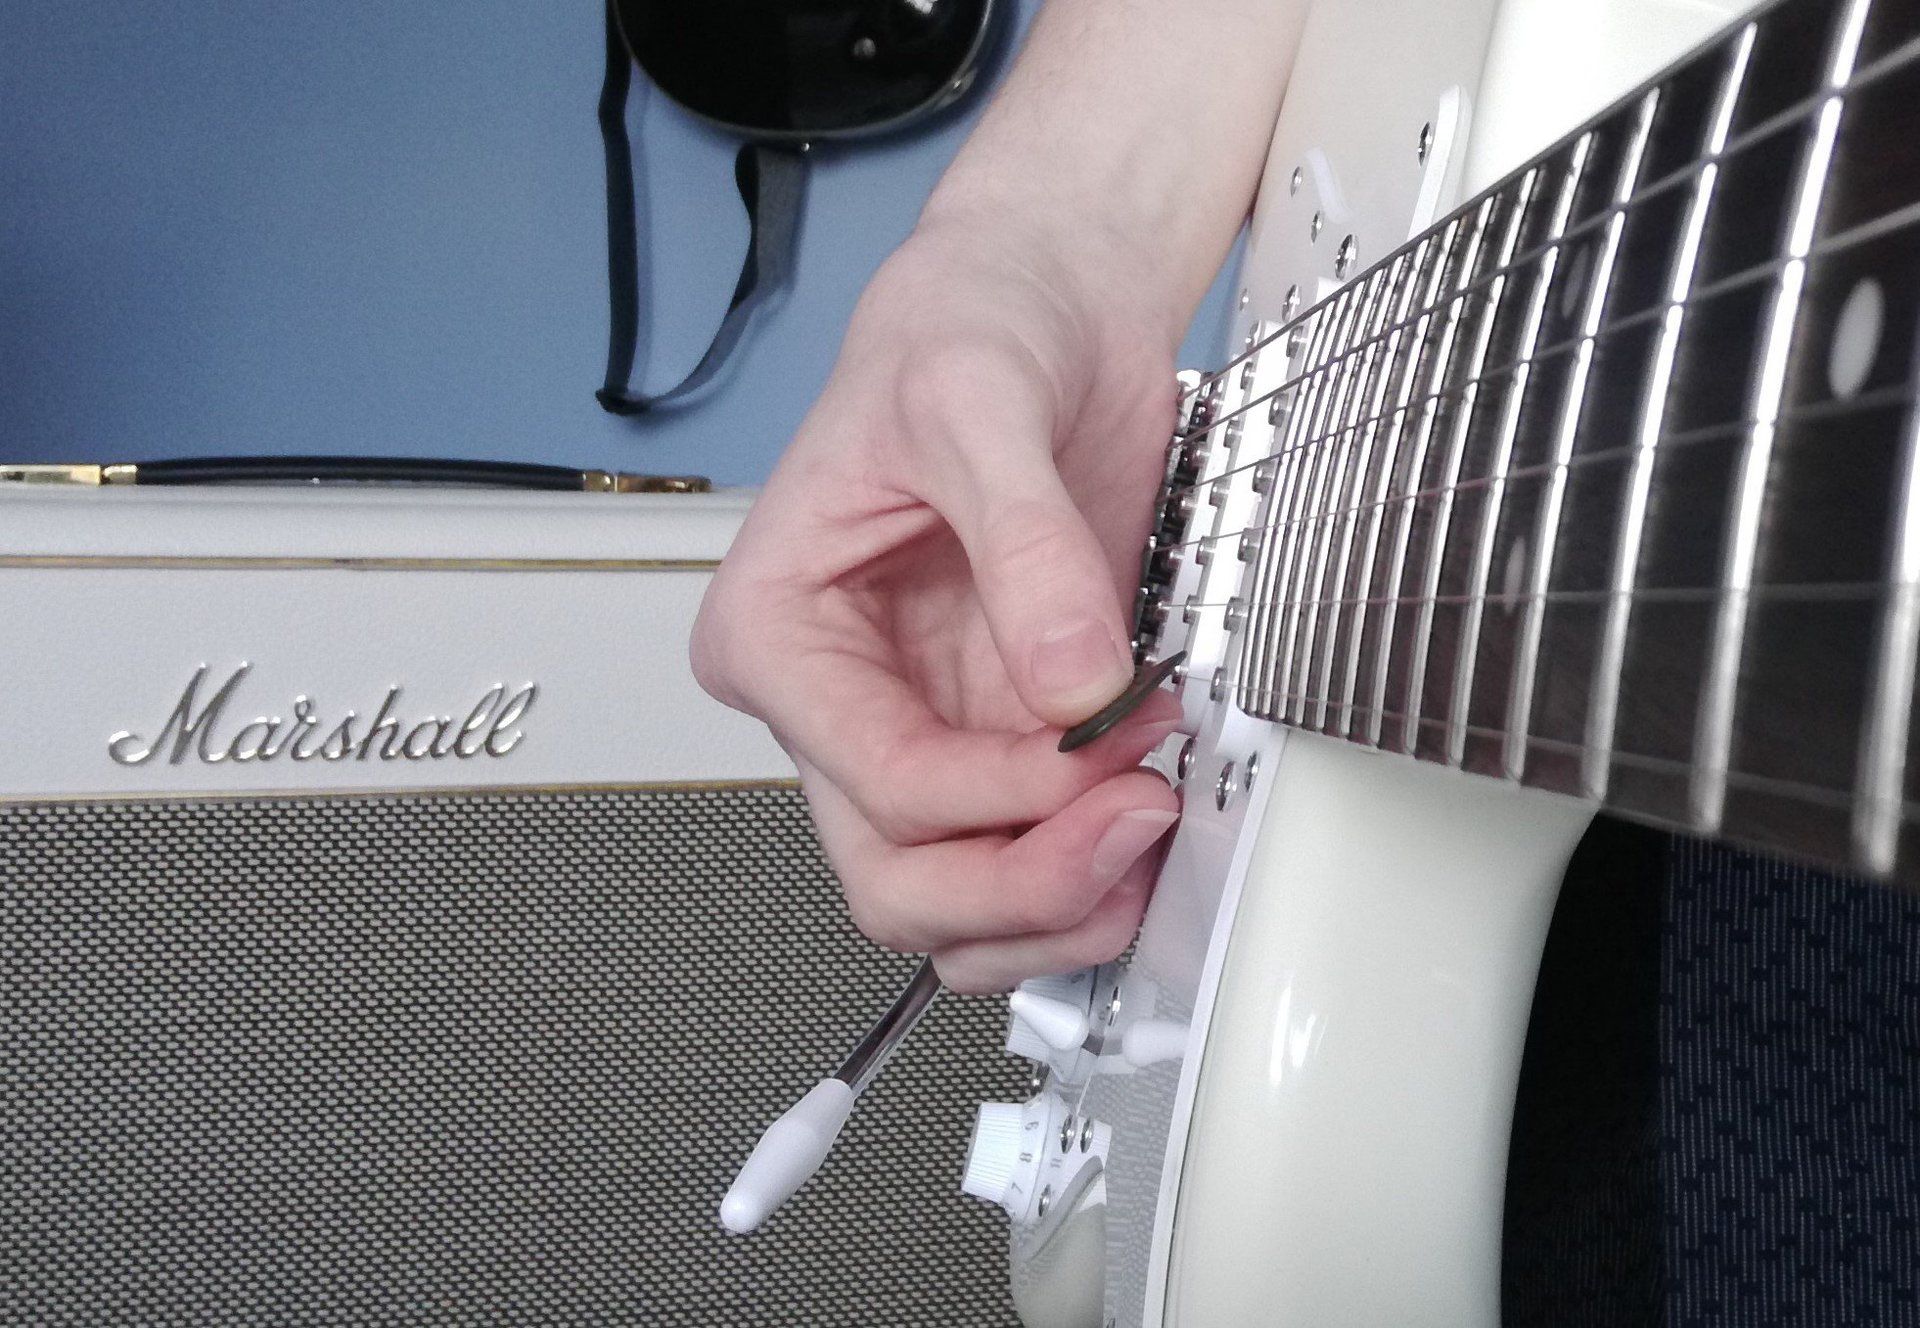
How does this work? Well, this is how you might normally pick:
We'll start by focusing on just one type of string change: making each string start on a downstroke and end on an upstroke.
We can make this easy for ourselves by using the "pick-slanting" technique.
How does this work? Well, this is how you might normally pick:
Straight up and down, with the pick perpendicular to the strings. However, if you want to change strings, it means you have to "jump" over the string like this:
This is very awkward to do at high speed, and doing it will really limit your speed potential.
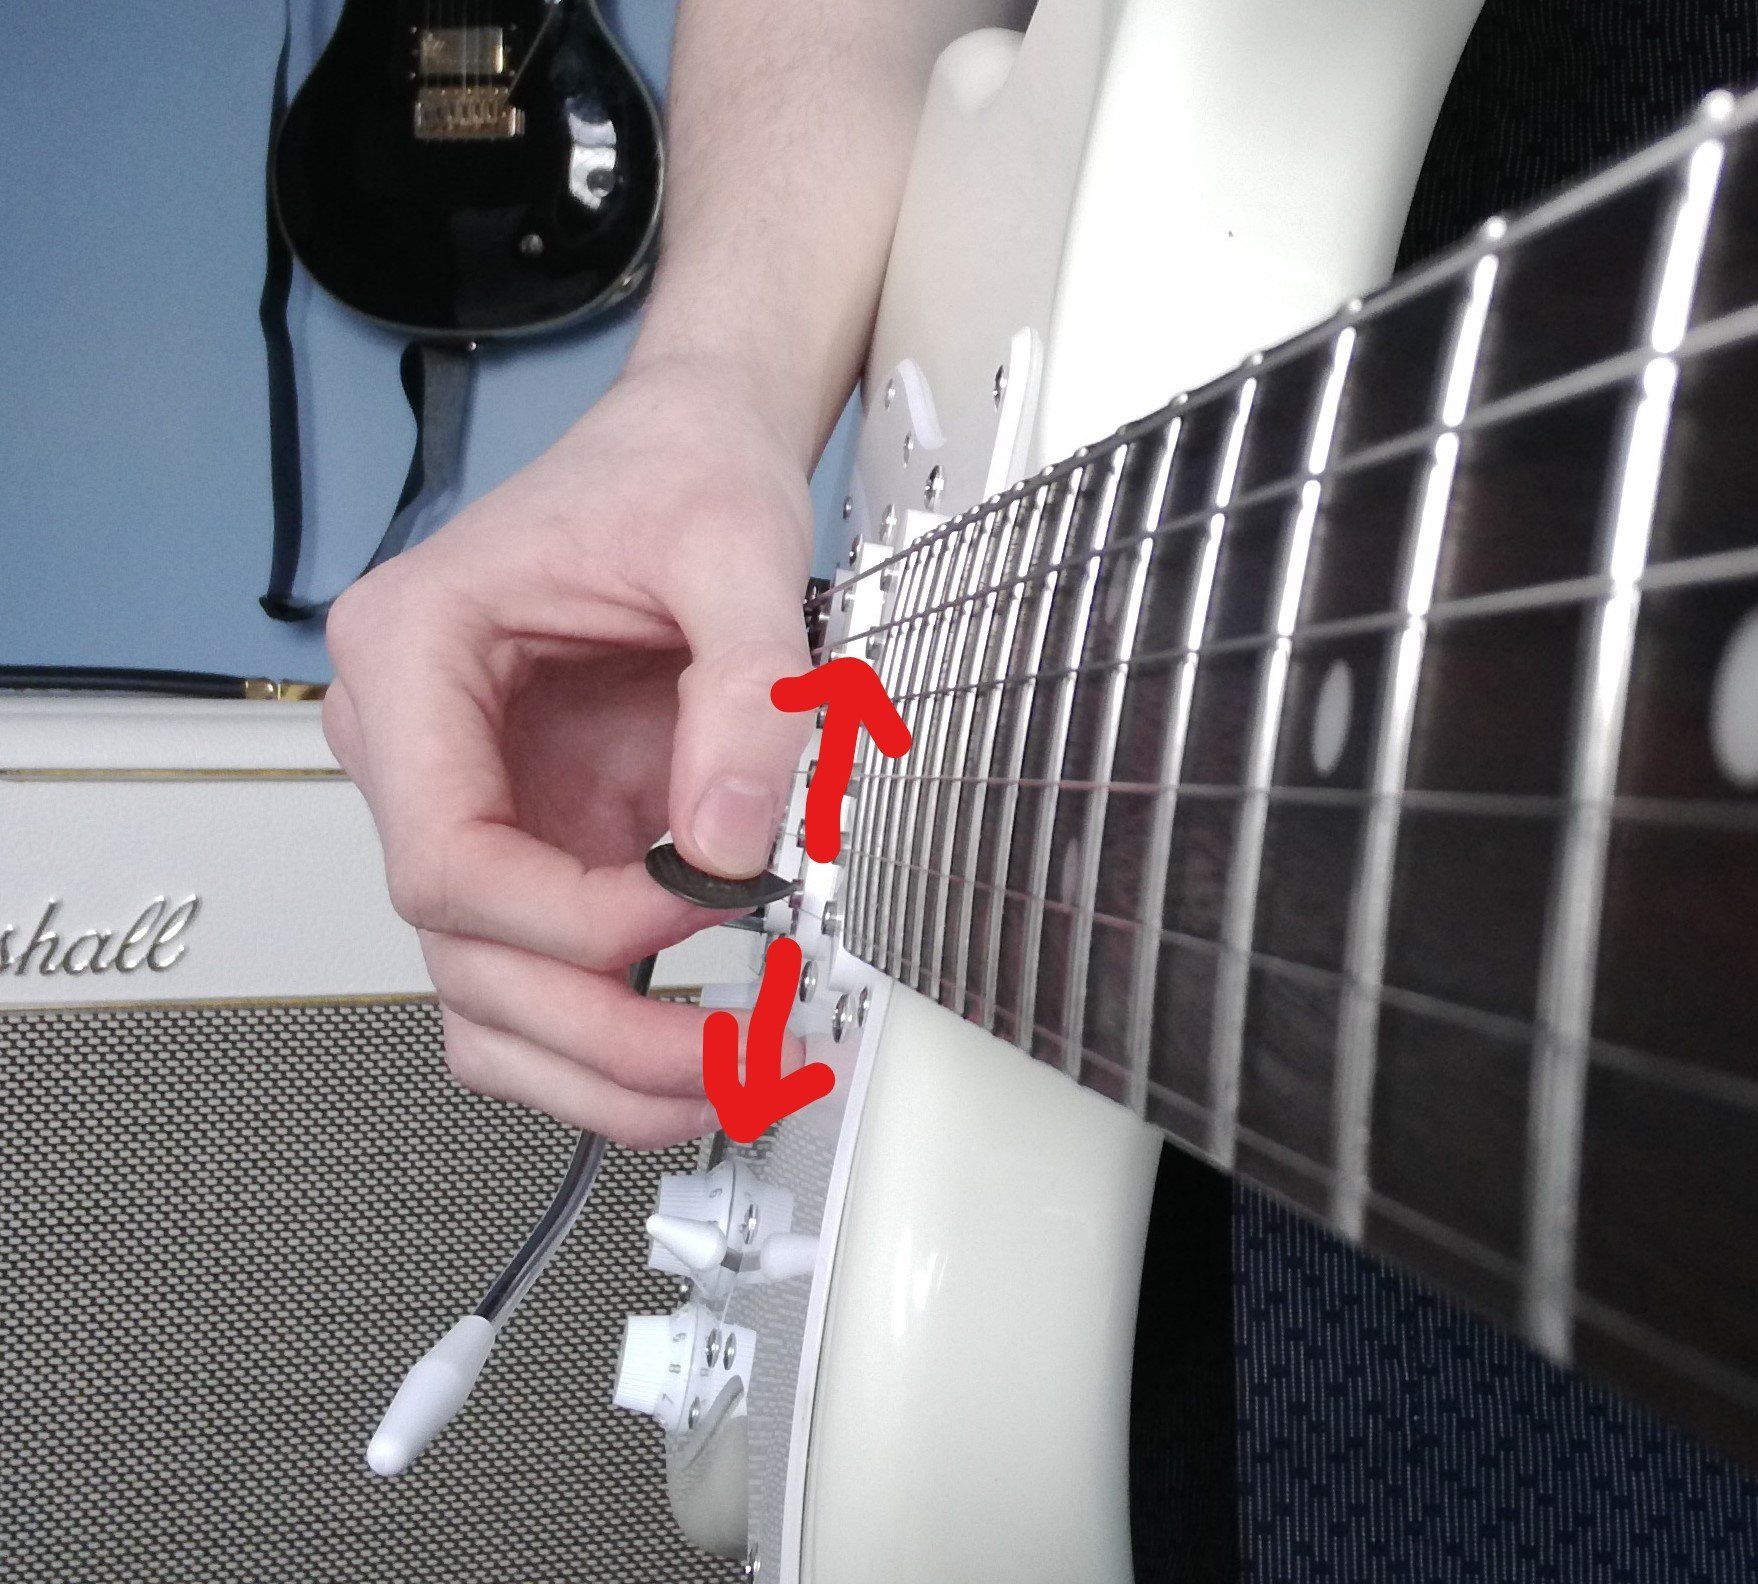
Instead, try positioning your pick like this:
Instead, try positioning your pick like this:
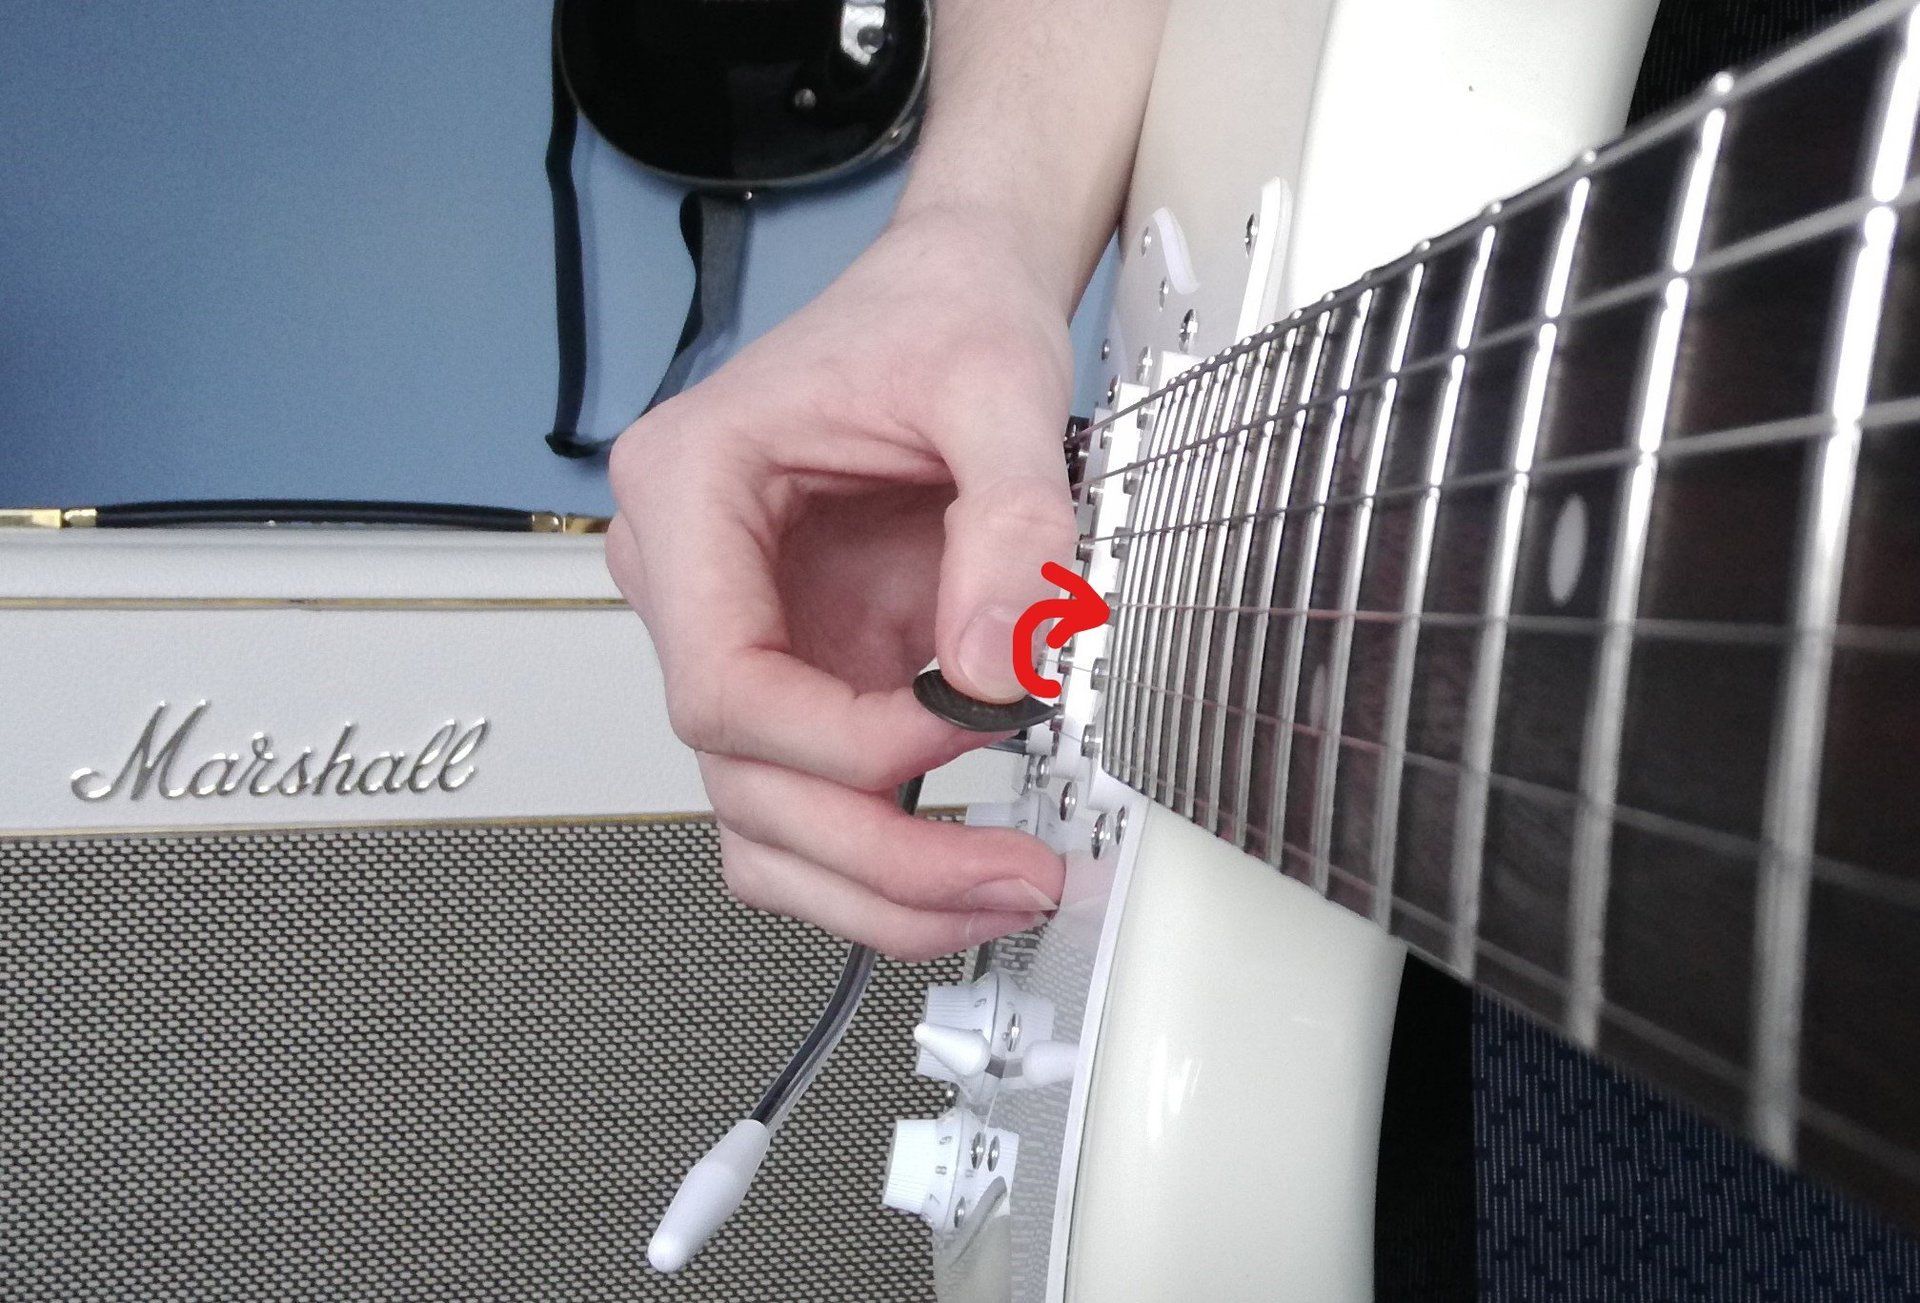
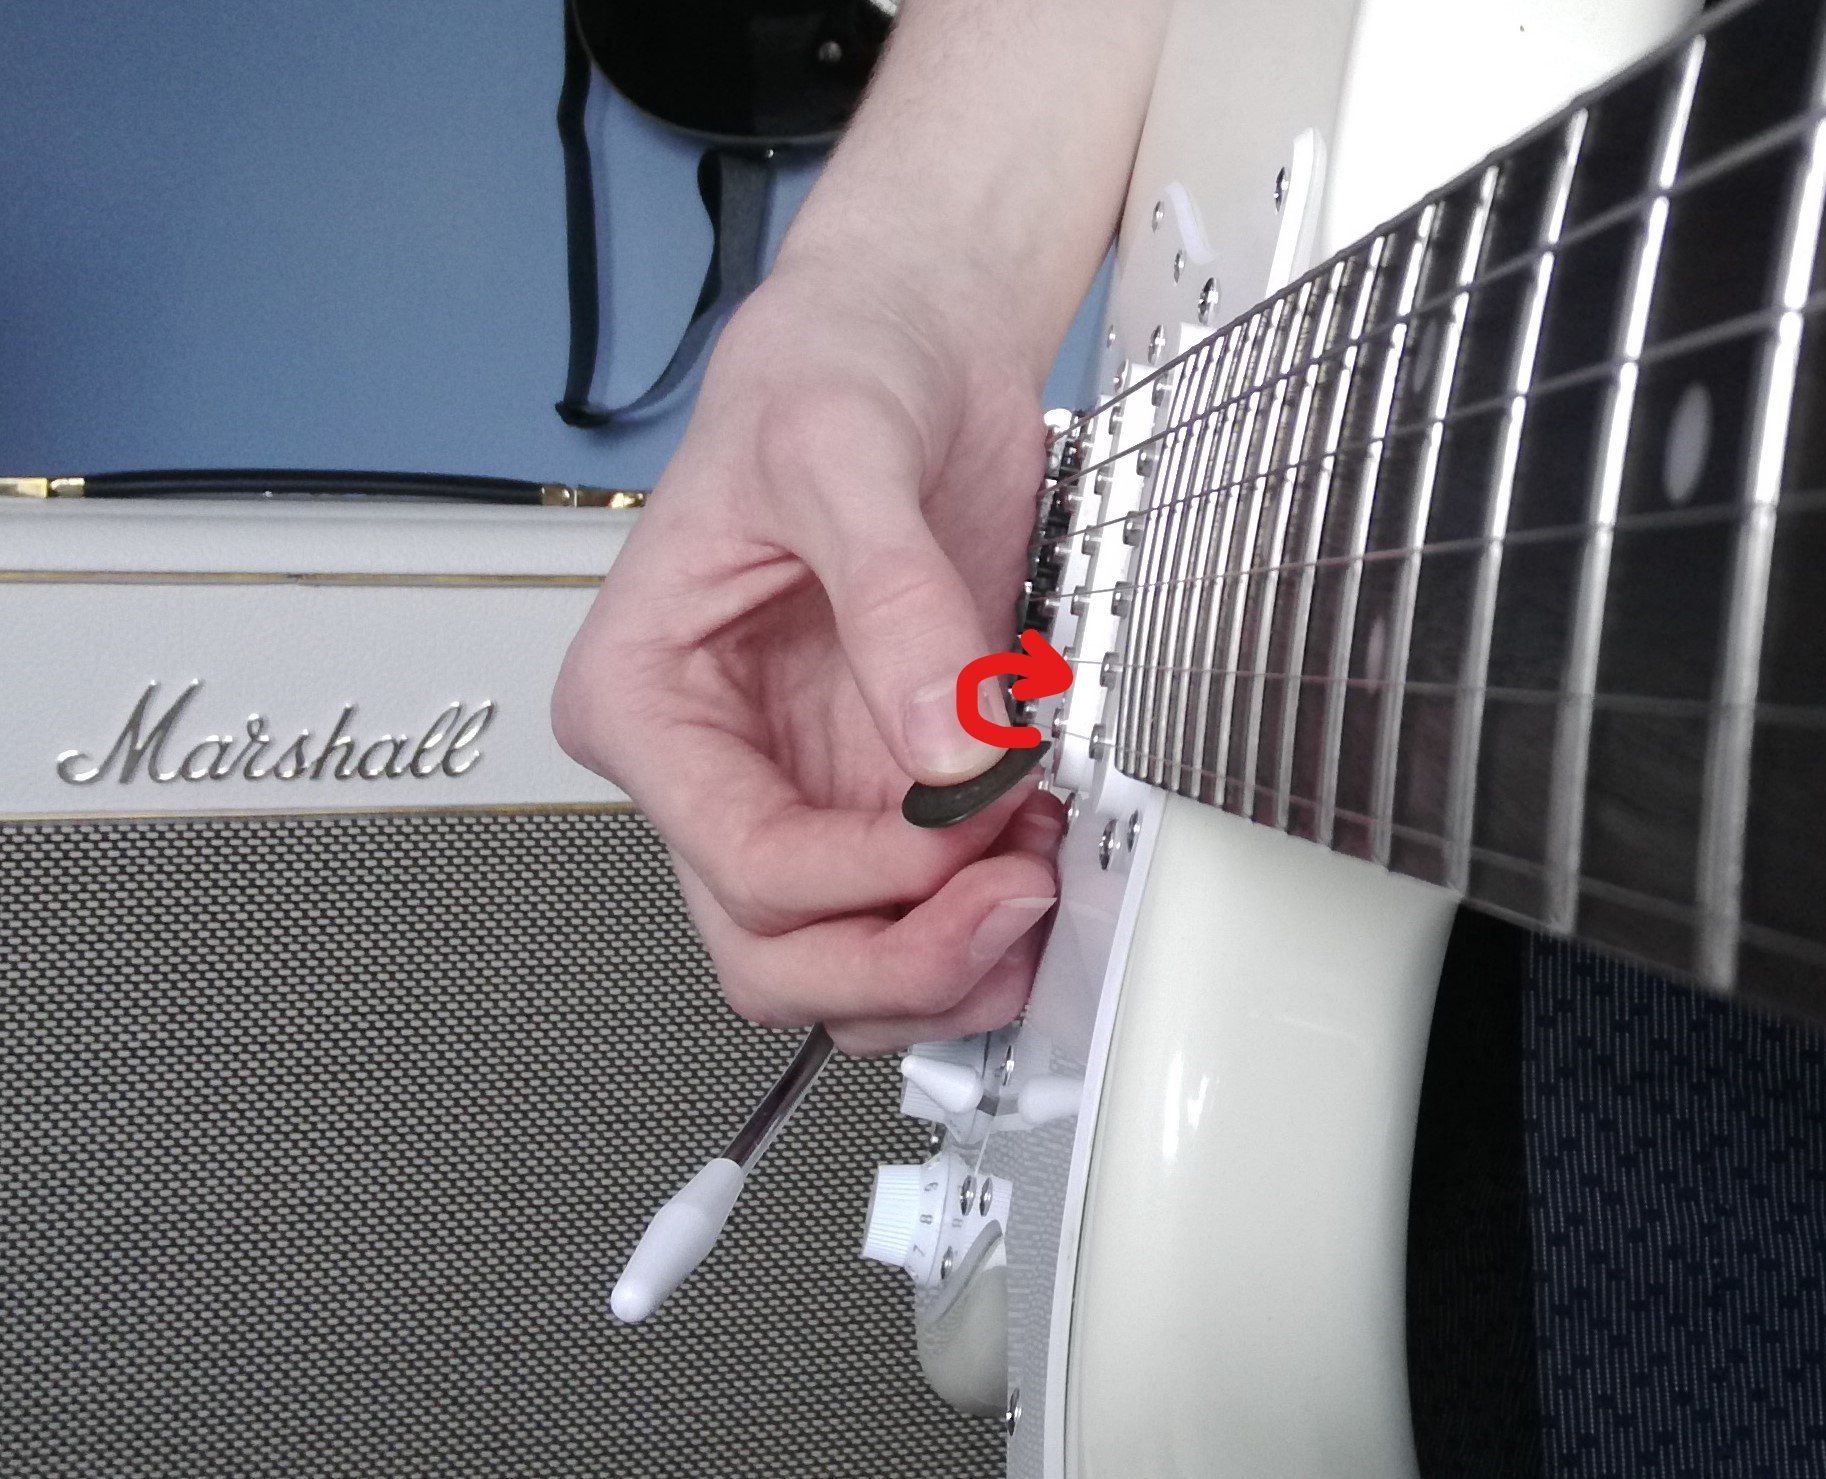
Now the pick is slanted so that the tip is pointed towards the ceiling. This is known as a "downward" pick slant.
This is the motion the pick would now make:
This is the motion the pick would now make:
Notice how we're still doing a back-and-forth, up-and-down motion, but the pick is at an angle.
This makes the pick go "in and out" of the strings as we play, going closer to the body of the guitar on a down stroke, then further away from the body on an upstroke , then closer again with the next downstroke, and so on.
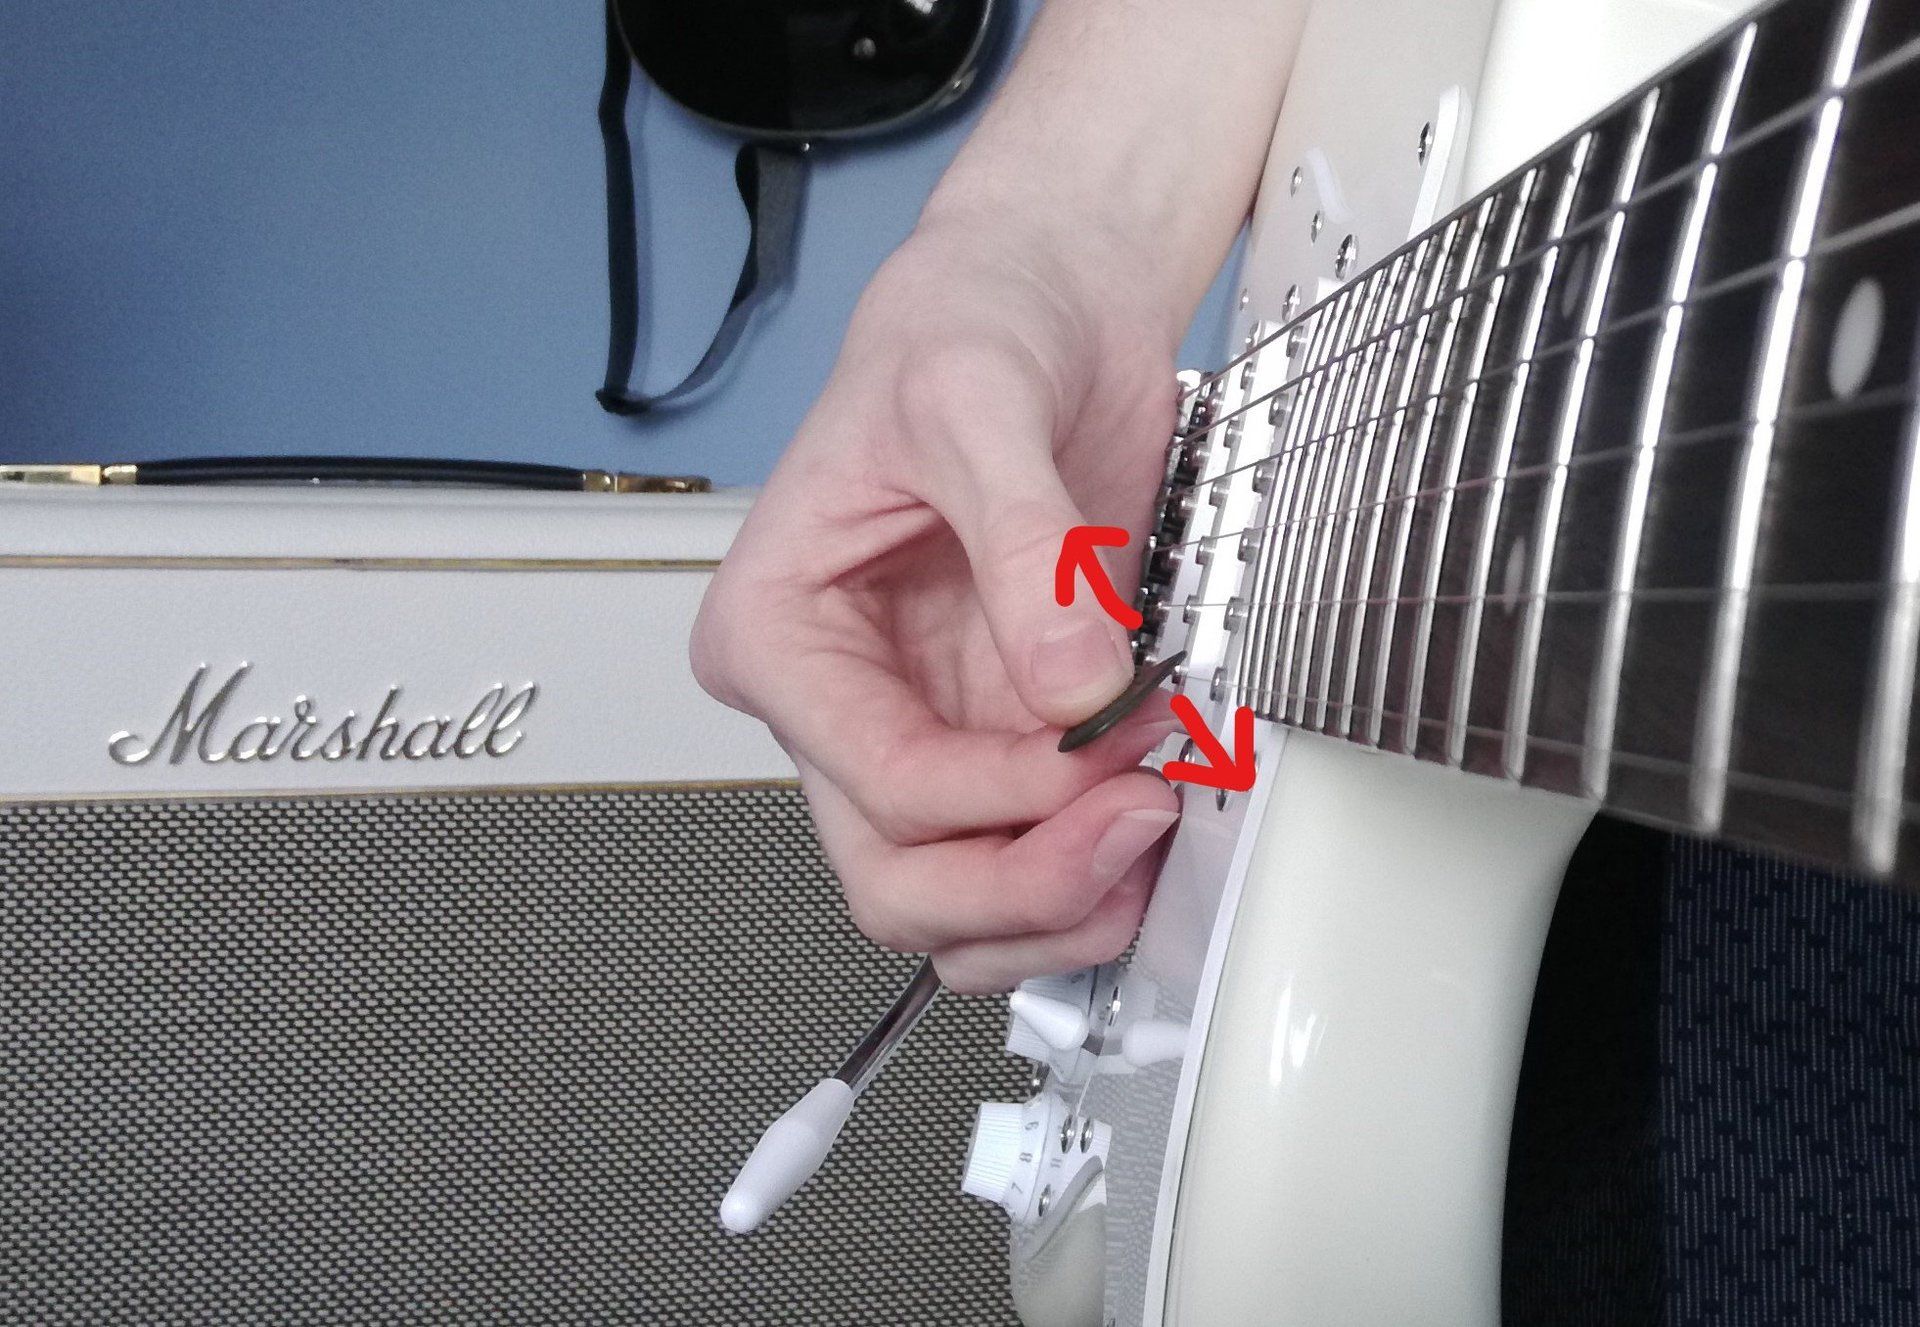
This means that after every upstroke, the pick is positioned above the plane of the strings like this:
This makes the pick go "in and out" of the strings as we play, going closer to the body of the guitar on a down stroke, then further away from the body on an upstroke , then closer again with the next downstroke, and so on.
This means that after every upstroke, the pick is positioned above the plane of the strings like this:
...which makes string changing much easier, because now we don't have to "jump" over the strings. Every time we do an upstroke, the pick is immediately positioned above the strings ready to change to a new one. It's like the "jump" from before is incorporated into the upstroke motion anyway, which makes changing to a new string after an upstroke really easy.
NOTE: This isn't the place for a full pick-slanting explanation - if you don't understand it, don't worry! There are more lessons coming on this very soon...
NOTE: This isn't the place for a full pick-slanting explanation - if you don't understand it, don't worry! There are more lessons coming on this very soon...
Have a go at picking on one string with the pick slant, and then try out this exercise:
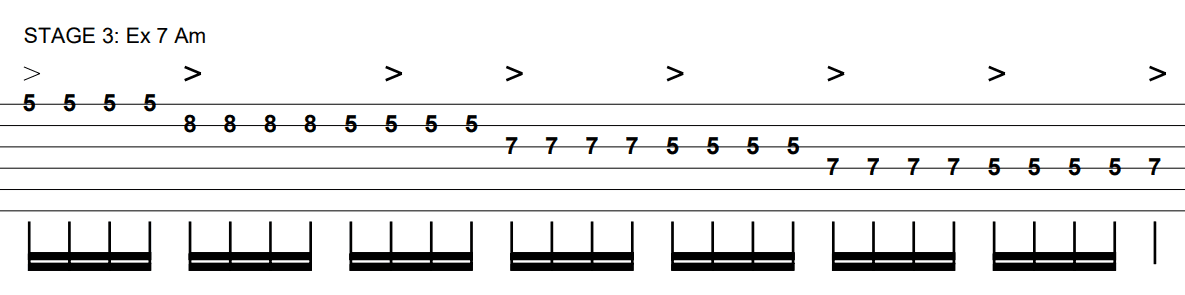
Now we're in A minor. All of the exercises in stages 3 and 4 are in A minor.
It's just a run down the A minor pentatonic scale, but we're picking each note four times. When you pick this example down-up-down-up, it means that every string ends on an upstroke - which, when combined with our downwards pick slant, makes string changes very easy.
Focus on the angle of your pick, and remember - let the downward pick slant do the work. Don't resort to "jumping" the pick over the strings.
This exercise is great to get used to the motion because the left hand part is very simple, meaning you can focus almost all of your attention on your right hand.
Once you've got the hang of that, try this:
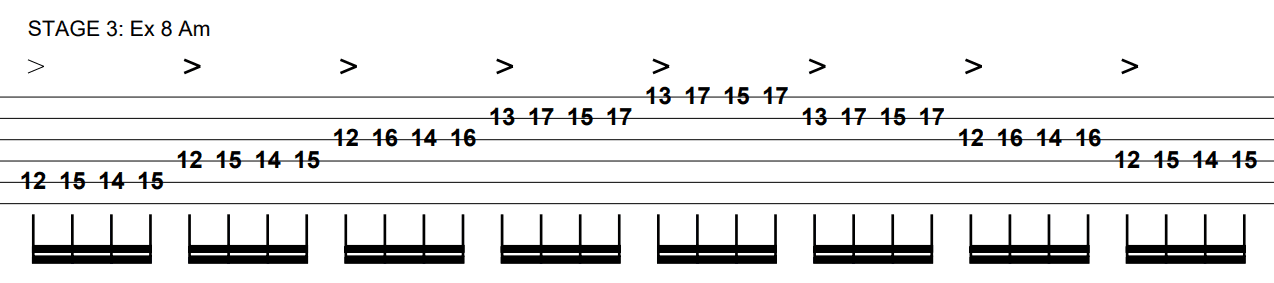
This is more complex. Now we're going across five strings, and we're playing the same four-note "block" on every string (just moved up the scale).
Again, notice how the last note on every string is an upstroke. Pay attention to the angle of your pick, and make sure there's no timing difference when you change to a new string. Every note should be perfectly in time.
We'll finish off this stage with this exercise:
Again, notice how the last note on every string is an upstroke. Pay attention to the angle of your pick, and make sure there's no timing difference when you change to a new string. Every note should be perfectly in time.
We'll finish off this stage with this exercise:
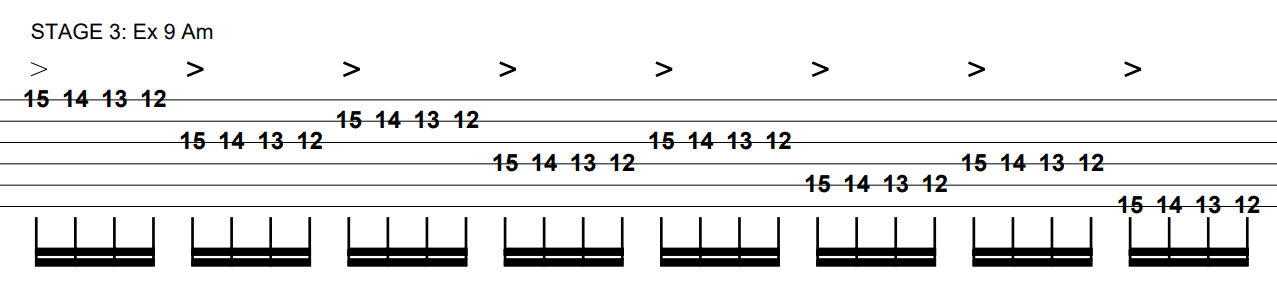
(Yeah, the image says it's in A minor, but really it's just chromatic!)
This time we're skipping strings which increases the difficulty - but you can still use the same motion to do the string changes. Just slant the pick downwards, and let the angle of the pick do the work.
Try to forget about speed here and instead focus on two things:
Practice those exercises until changing strings after upstrokes is the easiest thing in the world. Then, you can move on to Stage 4.
This time we're skipping strings which increases the difficulty - but you can still use the same motion to do the string changes. Just slant the pick downwards, and let the angle of the pick do the work.
Try to forget about speed here and instead focus on two things:
- Relaxation. Make sure there isn't any excess tension in your fingers, hands, or arms. Stay as relaxed as possible. If you're doing this right, it should feel effortless.
- Efficiency. Focus on making your movements small. Only move your fingers as far as is absolutely necessary, and keep your picking motions compact. Make the string change motion smooth and controlled by keeping the pick at an angle (yes, I know I keep saying that, but it's important!) and keeping your movements as small as possible.
Practice those exercises until changing strings after upstrokes is the easiest thing in the world. Then, you can move on to Stage 4.
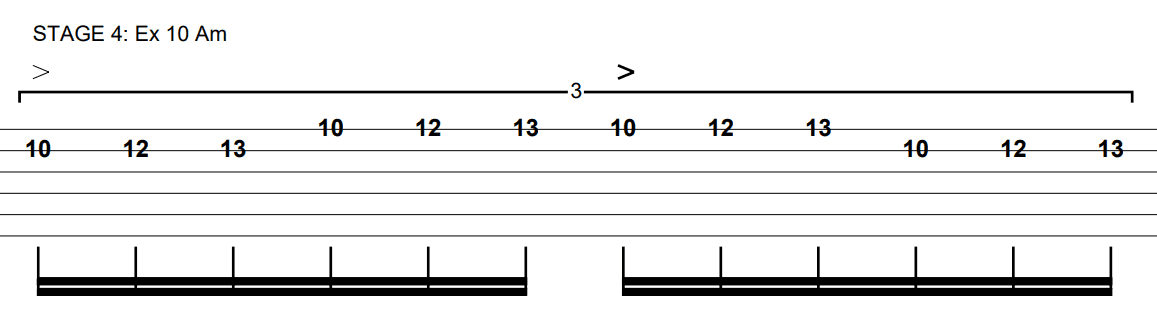
Stage 4: Changing Strings After Downstrokes
Now we're gonna do the opposite of what we did in stage 3 - we'e gonna change strings after downstrokes.
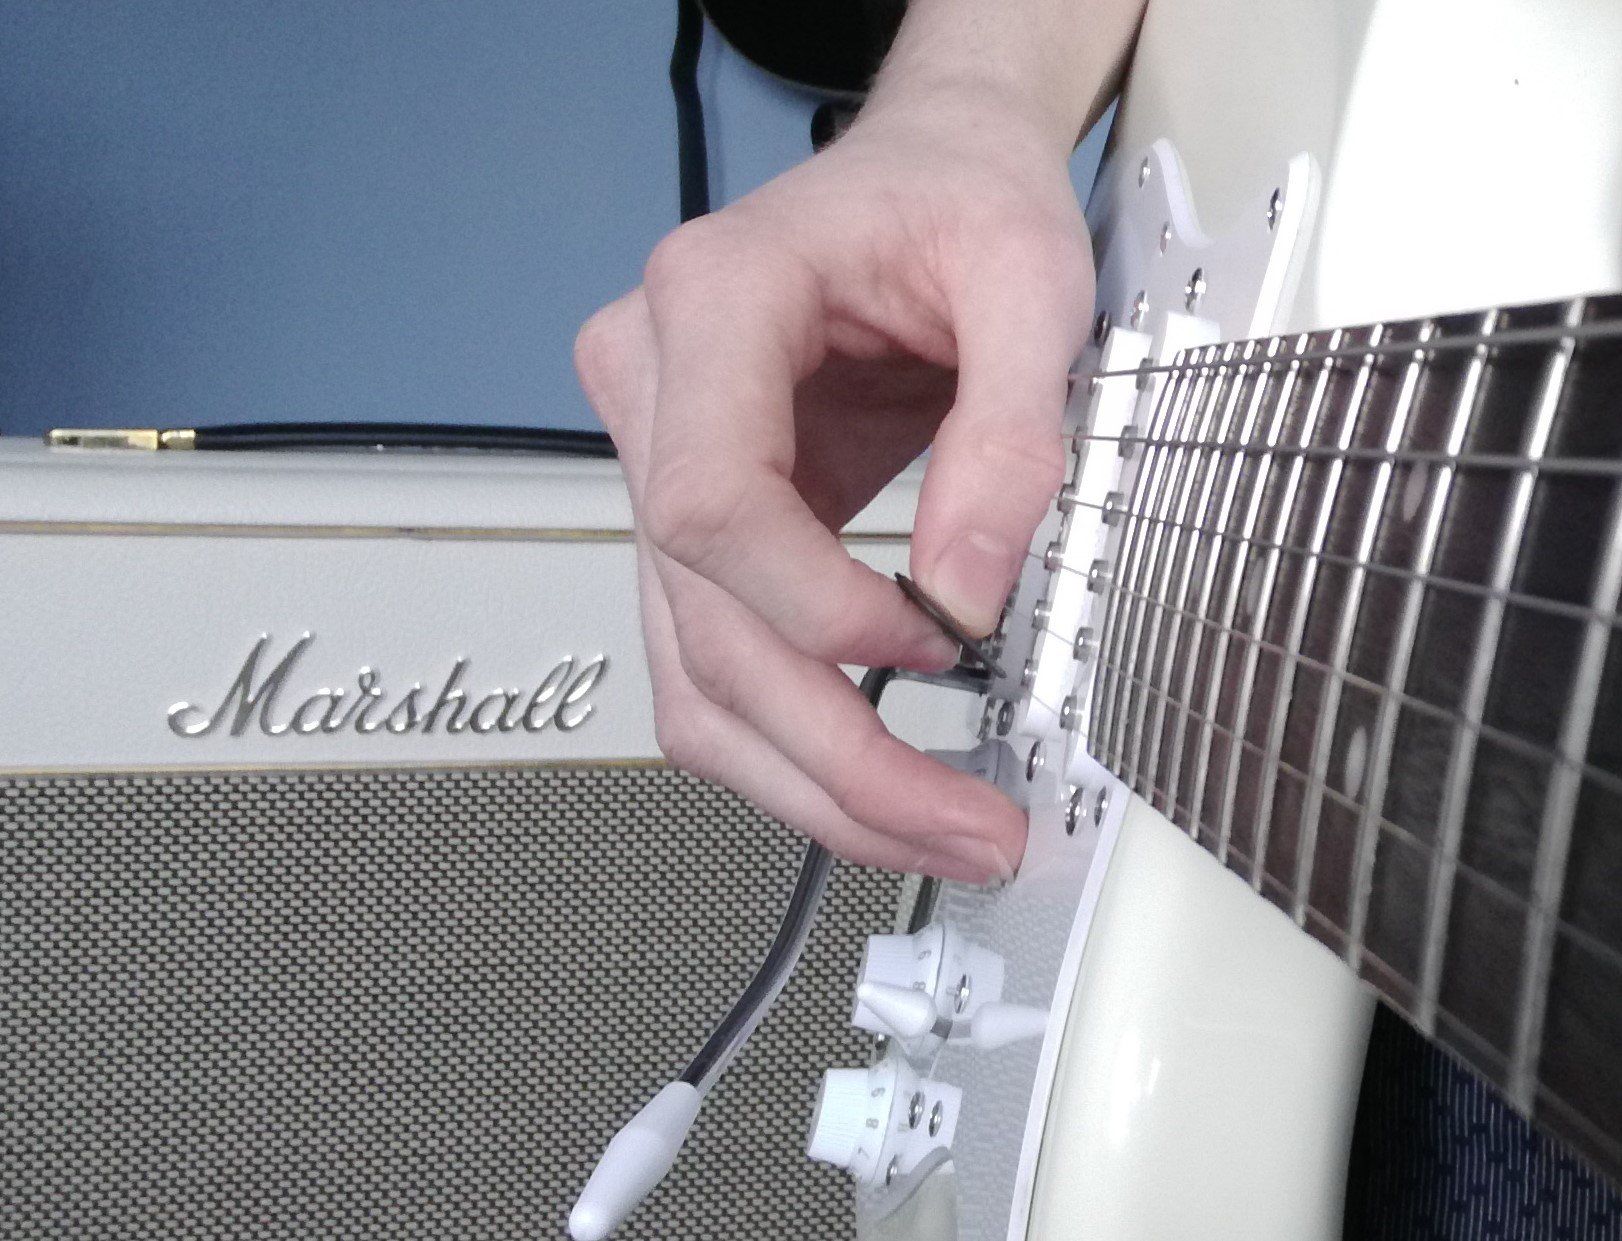
With our current pick slant, this is where the pick ends up after a downstroke:
With our current pick slant, this is where the pick ends up after a downstroke:
It's buried beneath the string! If we wanted to change to a new string after doing a downstroke, we'd have to do this:
...which would be practically impossible at high speed!
What's the solution? Easy...
...just slant the pick the other way.
Point it like this instead:
What's the solution? Easy...
...just slant the pick the other way.
Point it like this instead:
So the pick now moves like this:
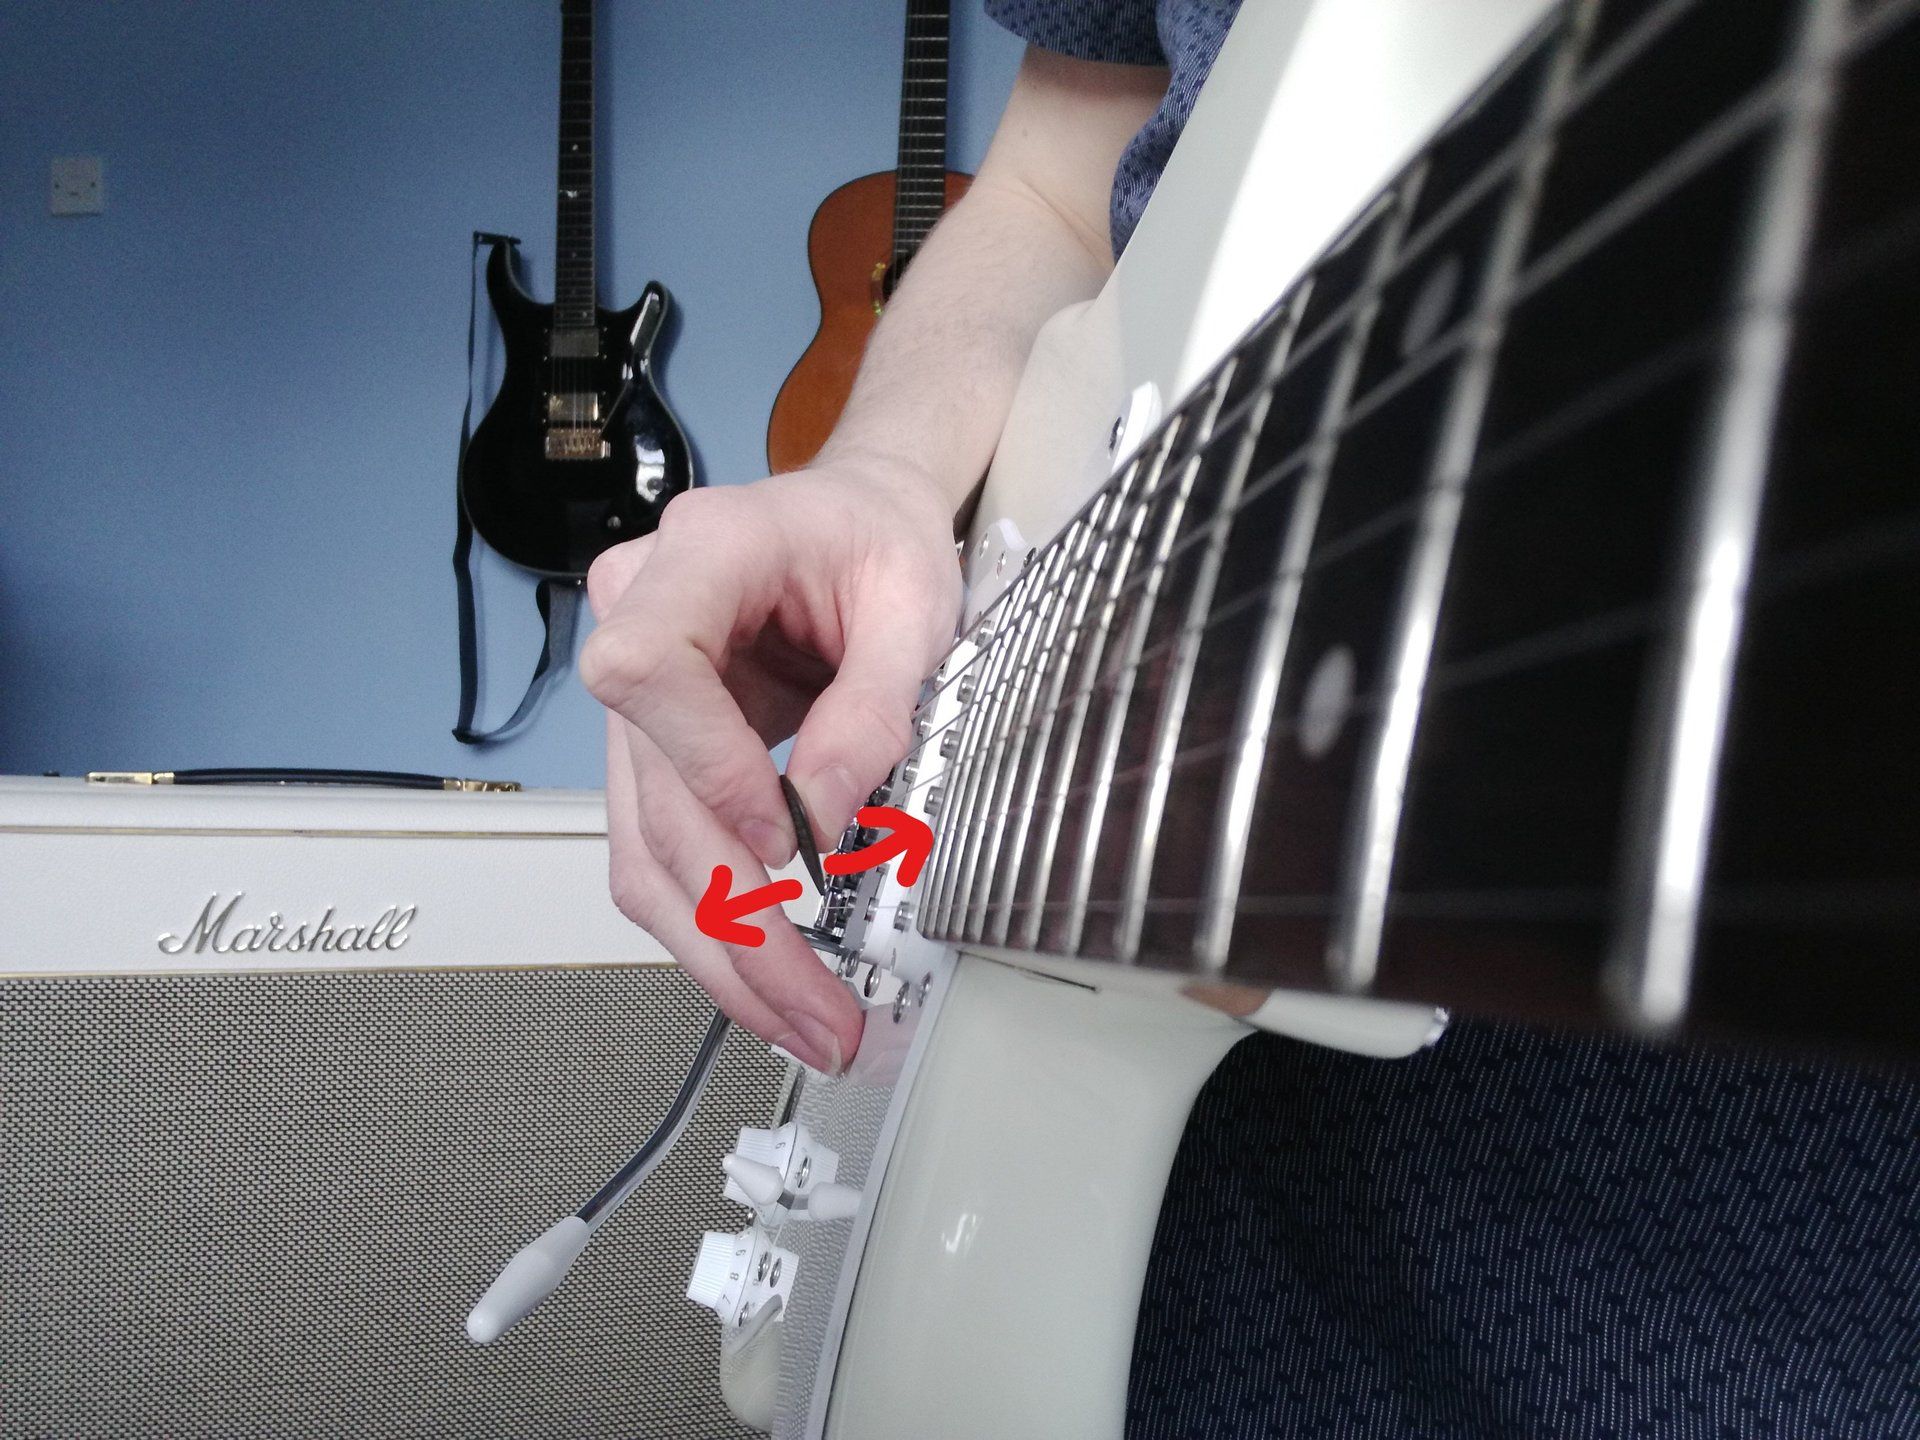
This means that after every downstroke, the pick will be lifted above the strings and it'll be easy to change to a new string.
Practice this new picking angle just on one string for a moment to get used to the new motion, and then have a go at the following exercises.
Here's the first one:
Practice this new picking angle just on one string for a moment to get used to the new motion, and then have a go at the following exercises.
Here's the first one:
When you alternate pick this, the last note on every string is a downstroke. If you slant your pick in the same way shown in the photos above, then the string changes will be pretty easy.
Once you've practised that for a while and you're used to the motions, try this:
Once you've practised that for a while and you're used to the motions, try this:
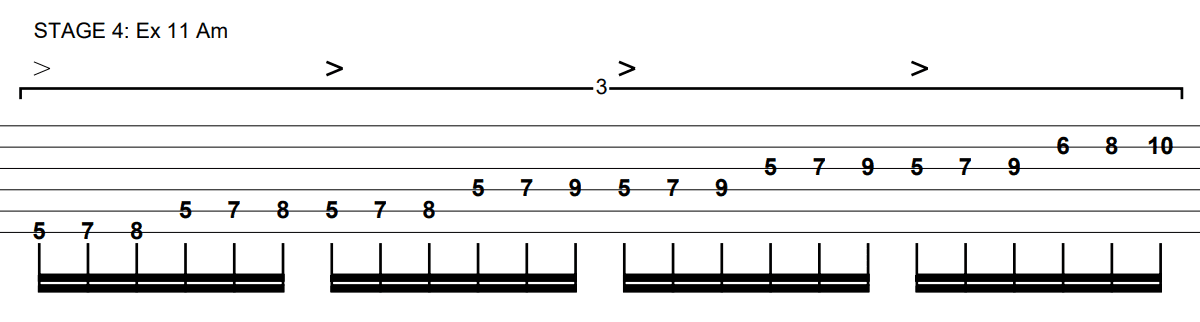
This is a similar thing, but now we're taking it across more strings.
Remember: let the angle of the pick do the work! Do NOT "jump" the pick over the strings, because that will really limit how fast you can play.
Focus on relaxation and efficiency, and forget about speed until you can play the lick perfectly and effortlessly. Then you can start to focus on speeding it up.
This is the last of the twelve exercises:
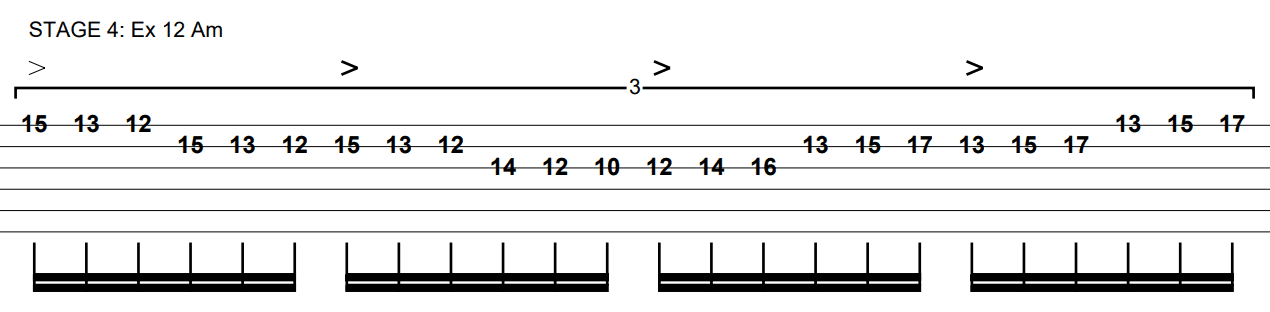
This time we've incorporated a position shift into the lick, but it's still nice and simple to play. Have fun with it - it's a great lick to add into your solos!
Final Thoughts
There you have it - 12 alternate picking exercises to help you master this vital skill!
Don't forget to grab the free guide "Boost Your Picking Speed by 50%". It'll help you to get to the next level of picking speed and control.
I hope you've enjoyed these exercises - practice them regularly, and you'll get great results.
Have fun, and keep rocking!
Don't forget to grab the free guide "Boost Your Picking Speed by 50%". It'll help you to get to the next level of picking speed and control.
I hope you've enjoyed these exercises - practice them regularly, and you'll get great results.
Have fun, and keep rocking!