
Super-Easy Guide: How to Master Guitar Vibrato and Create Your Own Signature Sound
Vibrato is something you can practice. Here's how to master this vital yet elusive skill.
There's nothing cooler than a soaring bend, ending in a heavy dose of vibrato. It's the perfect climax to a solo.
Vibrato - shaking a note up and down - is like your signature. It's a key part of any player's sound, and it's something that you NEED to master if you want to be a good lead player.
In fact, it's probably THE thing that makes the difference between an "OK" lead player and a great one.
There are famous players who can't shred, who don't use fancy scales, who don't have good technique...
...and yet every single one
has good vibrato!
Zakk Wylde once said that you can tell who's playing - whether it's Angus Young, Yngwie Malmsteen, BB King, etc. - just from the sound of their vibrato. It really is that important!
In this guide we're gonna go through everything you need to know to master vibrato and find your own signature sound - how to do it, how to practice it, and how to use it to get the sound that you want.
Some teachers say vibrato isn't something you can really practise - this is completely false. While it does
develop on its own to an extent, there are a few key things you can do to accelerate your progress.
Let's get started!
The 3-Step Strategy for Great Vibrato
There are three parts to this guide:
1) How to do vibrato.
This includes what motion to use, which muscles, what makes a great vibrato, and how to practice it to get maximum results in a short time.
2) How to use vibrato.
This is where you'll learn how vibrato fits into songs and solos, and how to use it well. I'm also gonna show you how to mix it up to really grab your audiences attention.
3) Who to listen to.
Here we're gonna go through samples of some really great vibrato - both in the guitar world and on other instruments. You can use these as inspiration and try to copy their sound to infuse your playing with the style of your heroes.
How to Do Vibrato 1: The Basic Idea
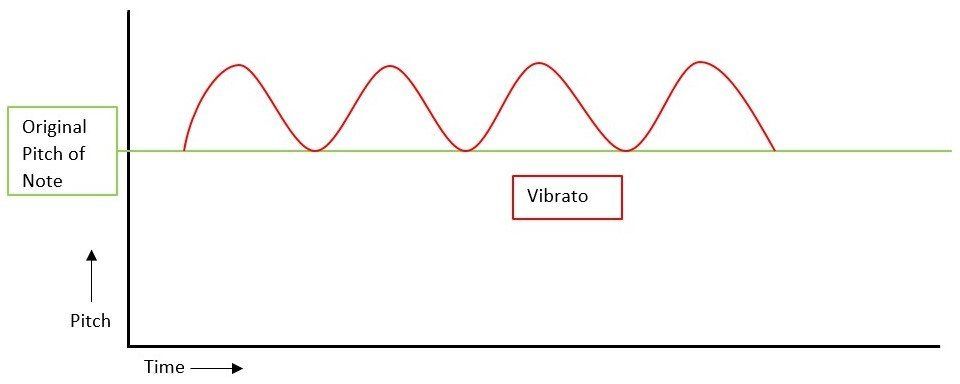
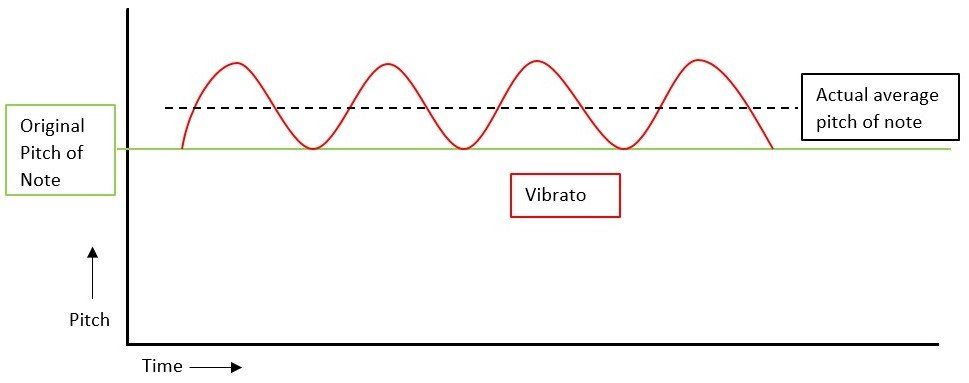
"Vibrato" is just a fancy word for vibrating the pitch of a note up and down again.
On a graph, here's what it would look like:
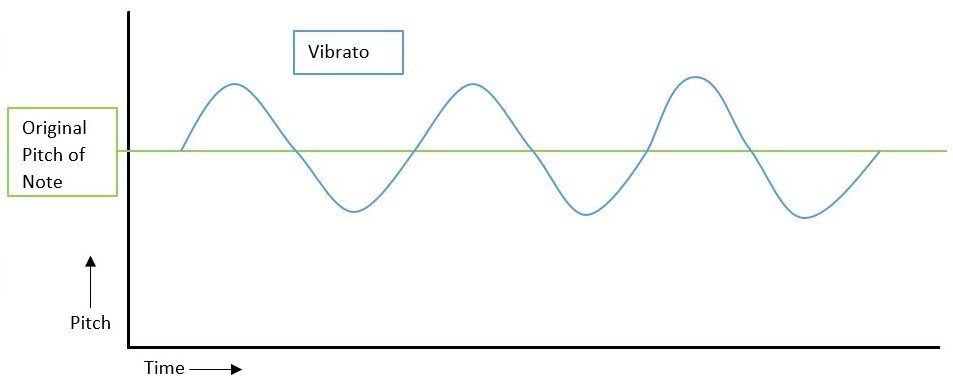
( Technically, on a guitar it often looks different to this for a really important reason. More on that later.)
You change the pitch of a note up, then down, then up, then down, and so on.
It's a cool effect that adds extra impact or flair to a note; it's common in singing, particularly in styles such as opera.
On guitar, because it vibrates the string, it actually makes notes sustain longer
- making it great for dramatic bends and notes that are held for a long time.
How to Do Vibrato 2: The Motions
There are essentially two ways you can vibrate the string.
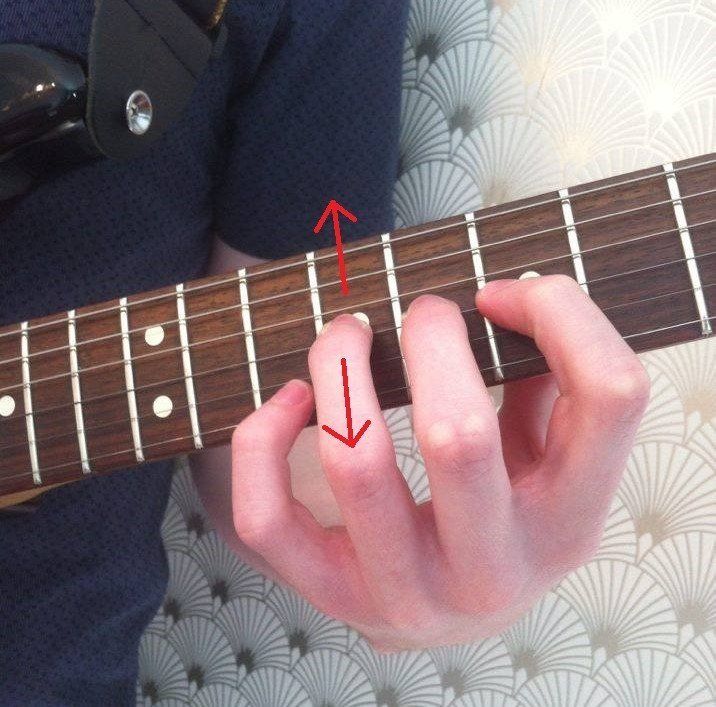
There's a "side to side" motion where you stretch and compress the string by moving your hand sideways:

This results in a very subtle change of pitch, that is great for soft styles of music. Classical players use this kind of vibrato all the time.
Then we have "up-and-down" vibrato, where you bend the string up and back down again to create the change in pitch. If you know string bends (which you should before learning this), think of it as a series of string bends and releases one after another.
That kind of vibrato is what most electric guitar players do. It's possible to make much larger changes in pitch, making it great for rock playing where you want a more aggressive sound.
Steve Vai sometimes does a "circular" vibrato which is a combo of these two movements, but that's more of a "niche" thing. If you learn these two, the circular variety shouldn't be an issue.
There are a number of different ways to do both kinds of vibrato. We'll start with the "side-to-side" kind.
The main way to do this is by moving your arm; it's straightforward to do, but can be difficult to control. Play a note (it doesn't matter which one) and move your arm side to side from the elbow. Try it slowly at first.
Notice how the note changes in pitch: higher as you move towards the head-stock, and lower as you move towards the body. Gradually increase the speed to experiment with the feel and sound. Remember to keep your hands relaxed.
You can also do it with your fingers. With your thumb on the back of the neck, play a note and try just moving your finger side to side. It'll feel awkward at first, but you'll get used to it and quickly see how much control it gives you.
Both ways are good to learn, or at least try out. The more choice you have, the better you'll be able to express yourself.
There are loads of ways to do "up-and-down" vibrato.
You can do it by rotating your wrist with your thumb over the neck, like this:
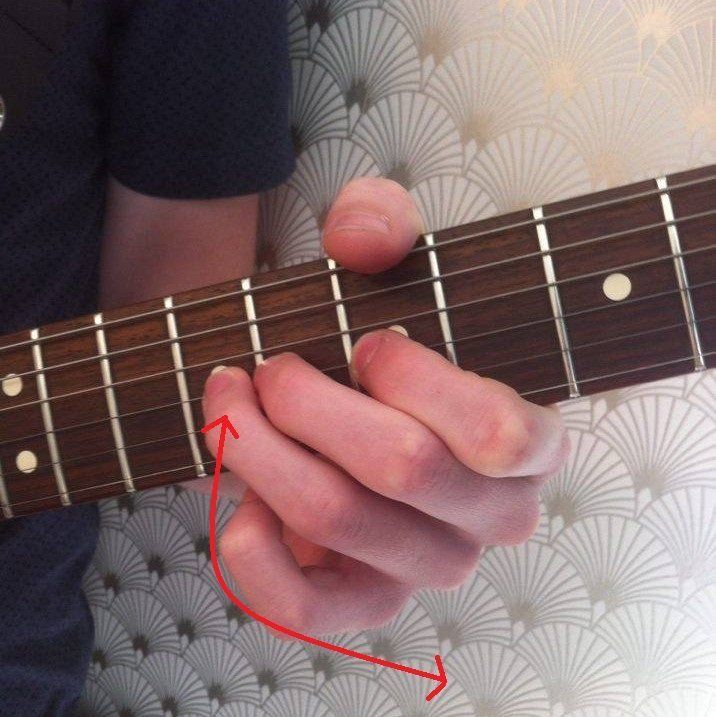
Some people say that this gives you more control, but I think the opposite is true. Sure, it might be easy to move the string up and down, but with your thumb over the neck it's difficult to play other notes straight after.
Good technique on guitar is keeping your thumb behind the neck (it helps your fingers to move freely), and anything that compromises this is generally a bad idea.
BB King does this and gets great results though, so there really are no "rules"! However, you can do "wrist" vibrato just as effectively with your thumb behind
the neck - this sounds just as good, but makes it loads easier to do in the middle of a song/solo.
Another way to do it is by moving your arm. This is similar to the side-to-side arm vibrato, but you're moving your arm up and down instead.
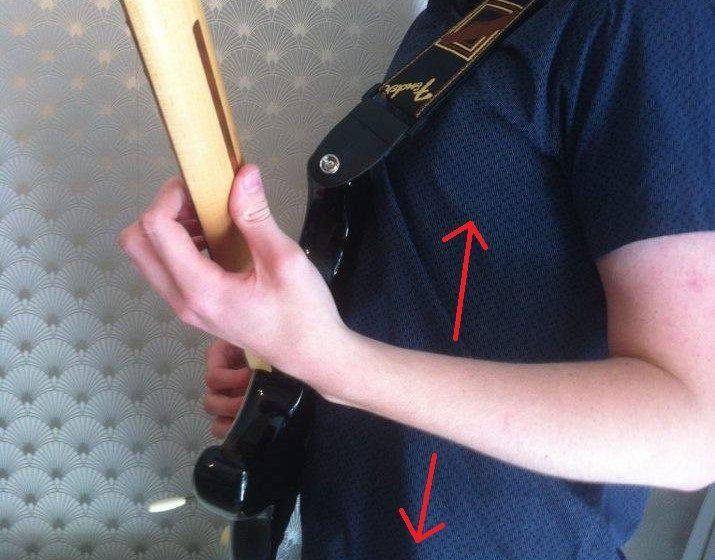
Eric Clapton can often be seen using this technique, although he does use his wrist too.
Try it out and see what you think; it's very easy to do while keeping your thumb behind the neck.
You can also use your fingers for this. It's useful, but can feel awkward at first (especially if doing it on a bend). Try it - it might work really well for you!
You can do any of these, including a combination if you like. Most players stick to one as their "main" kind of vibrato because they can focus on making that one sound great, but it's very useful to learn the others so that you have more options.

How to Do Vibrato 3: The Key Elements of Amazing Vibrato
OK, now on to the fun stuff!
What actually makes some people's vibrato great?
Contrary to popular belief, it's not
the motions they use. They're important, obviously, but you can use pretty much any motion as long as you master these two key elements:
- PITCH
- RHYTHM
Get those down, and you'll have an amazing vibrato.
We'll deal with pitch
first.
I remember once getting recordings of my favourite players doing vibrato and slowing them down; despite all the differences between players, I noticed some key similarities.
First, they were all going back up to the same pitch
each time. Sure, some players went up to a higher pitch than others, but on any individual note they'd always go up to the same pitch.
There were some exceptions (that we'll get to later on), but this was one of the keys. If they went up a semitone, then they kept
going up a semitone every time they moved the note up again.
This made the vibrato sound like they meant it, and not like they didn't know how to play a note properly.
The other key thing was that they nearly always went back down to the correct pitch
.
They didn't stop the vibrato half way down and then go back up again, they went straight back down to the original pitch of the note before bending back up.
This made it sound in tune.
SUPER EASY TIP:
The really easy way to do this is to bend the note up, and then release most of the pressure on the string so that it goes straight back down by itself. Instead of consciously "bending back down", just relax your fingers/arm/wrist so the string does the job for you and the tension makes it go back to its original position. Bend up again, and then relax and release the bend. Bend, relax. Bend, relax. Practice it slow at first, and then speed up when you have control. This makes it dead simple to go back to the original pitch!
Notice I said "nearly always" - this is because when adding vibrato on bends (or if you're using the whammy bar), you can release the vibrato below
the pitch of the bend, and then bend back up past it again.
In this case, it's best to bend down and up past
the original pitch of the note by the same amount - so you'd hold the note for a little bit, and then start to bend it down (for example) a semitone, and then up past the note a semitone, and so on.
You could also just bend up and return to the pitch of the original note, if you like - that also sounds good.
Now we're gonna do rhythm.
This is straight forward - just make sure the speed of your vibrato is consistent when you play a note.
I don't mean it's gotta be the same speed every time you play - just that if you're doing it on one note, you should be able to keep it the same speed until you stop holding the note.
You should have the ability to do it in time to a beat, or a song too - this is crucial
to making it fit in.
Again, it's all about consistency - the gap between each bend up and bend down should be the same (a quarter of a second, for example).
You're not always gonna do that, of course, but being able to do it will give you the control to do other things too, and change the speed on-the-fly if you want.
How to Do Vibrato 4: The Ultimate Practice Method
Most people let vibrato develop naturally, without devoting any practice time to it.
Although it does
improve just through playing, it's more effective to focus on it in isolation.
First we're gonna focus on pitch; this'll be easy if you're good at string bends. Then were gonna master the rhythm aspect, keeping the changes in pitch consistent and accurate.
After that we can add vibrato to string bends, creating some awesome sounds and effects.
Practice Part 1: Pitch
For this it's best if you have a highly responsive electronic tuner, but if not then you can still do the exercise.
The idea here is to get used to doing small
bends accurately. A semi-tone (one fret) is probably the largest you'll go for vibrato, so even if you're great at string bends this'll still be a new challenge.
Note: Because side-to-side vibrato is so subtle, it's pretty useless to practice pitch with it. Go straight on to rhythm practice instead.
The nice thing about electronic tuners (either the head-stock or pedal variety) is that they show you how far away the note you're playing is from the correct pitch.
Why is this good? Well, it means we can practice bending slightly
up and down without having to guess if we're doing it right. We can use the in-between markers to show us what pitch we're bending to.
EXERCISE - MINI BENDS
Grab your tuner and play a note on the guitar; if its in tune and set up well then it should show you're playing a correct pitch.
For this example, let's say you choose the F note on the 10th fret of the G string.
Then, bend the note up slightly and hold it there; what pitch is the tuner now showing? In our example, let's say it's showing a pitch 4 notches up from the F note.
Now, release the bend, so you're playing (in our example) the F note again. Make sure you release it all the way, so the original note is in tune!
Then, bend back up to the same pitch. Then release the bend again, and repeat.
At first you can do this while looking at the tuner, to get used to how far to bend. Soon, though, you'll want to try it without
looking at the tuner - and then look at the tuner when you think you've bent far enough.
This means you'll need to use feel and sound to get the bend right, which is exactly what you'll use when playing for real.
Try it on loads of different notes all over the neck, and practice bending by different amounts, too. How about bending up and down by 6 notches, or even a full semitone?
Have fun with it! See how accurate you are, and set yourself challenges. Can you bend to the correct pitch ten times in a row?
See how many timesin a rowyou can bend accurately, and then try to beat your own "high score"!
When you can do this (i.e. when you can bend to pretty much the same pitch, most of the time - it doesn't have to be perfect
), it's time to move on to rhythm.
Practice Part 2: Rhythm
For this you'll need a metronome. If you don't have one, you can use the free one google have available by searching "metronome":
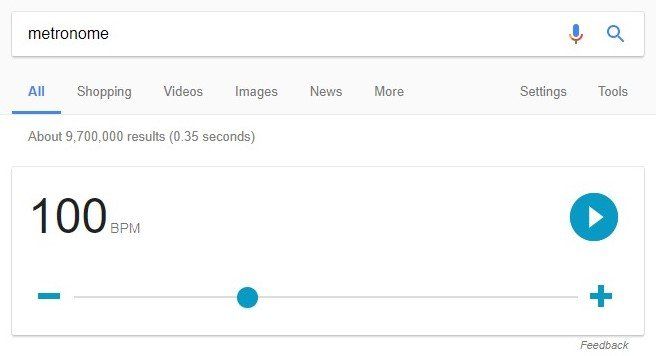
Set it to a comfortable tempo, like 60bpm.
Then, play a note on the beat, and bend up on the click of the metronome.
At the next click, release the bend again. On every click, bend the note up or back down.
After a few minutes of that, try increasing the tempo to 90bpm. Can you still do it accurately and in time? You can use a tuner to check your pitch again, if you like.
Then go back down to 60bpm, but this time bend up and
back down for every click of the metronome. Make sure you're still bending to the same pitch.
Gradually work up the tempo in 10bpm segments until you get to 120bpm. Spread it out over a few practice sessions.
Then go back to 60bpm again, but this time bend up and down twice for each beat! This is where is starts to sound like actual vibrato. You should be playing the note, then bending up, back down, up, and then bending back down on the next beat.
Make sure you're in time.
Build up the tempo gradually again - all while maintaining control - until you get to a tempo you're happy with. Feel free to go back to "pitch" practice if you feel your pitch control is suffering.

Practice Part 3: Adding Vibrato to String Bends
Firstly, MAKE SURE YOUR BENDS ARE IN TUNE! You should be able to do them without difficulty, and they should be consistently on pitch. Use a tuner to check, if you like.
You should also have good control over vibrato on normal notes.
Then, it's time to practice them together. Start off by using the "pitch" practice method again but this time start off with a bend, and release it slightly (say, five notches down on the tuner) before bending it up past
the original note by the same amount (so in our case, five notches again).
You're starting off with a bend and then making it flat, then sharp, then flat, then sharp, and so on. If you make the bend flat and sharp by the same amount, the average pitch will be that of the bend and it'll sound in tune.
Then go on to "rhythm" practice, just like with normal vibrato. You'll find that it's more difficult to control, but with practice it'll quickly become easier and easier.
How Often Should I Practice?
Some skills are best learned by doing loads of practice in a short time (such as three hours a day for a week) to get breakthroughs before going back to normal practice (say, 30 minutes a day).
This is true for complex skills that require a "big push" to create progress, like fast sweep picking. Sometimes, small and often just isn't enough!
Vibrato, though, is different. Like learning scale patterns or chords, it's best to do a small amount every day.
This is because you can learn it, then forget it, then learn it, then forget it, and so on, until you no longer forget it. This is how you get things into your long term memory.
For vibrato, I'd recommend committing just five to fifteen minutes a day. Follow the practise methods above, and after a few weeks you'll see some really good results.
Then, practising it will become a habit and you'll do it with no effort; your vibrato will get better, and better, and better!
How to Use Vibrato 1: Guitarists Are Liars
Now you know how to do
vibrato, it's time to learn how to use it! This is just as important as learning the technique.
Firstly, let's look at that graph again:
This is what vibrato looks like when a violinist does it, or when we do it on a string bend. Notice how the note is bent both above
and below
the original pitch.
This is also what happens when you do "side-to-side" vibrato; the string is both stretched and compressed to change the pitch.
This makes it sound in tune because the average
pitch is the same pitch as the original note.
But what about when doing regular "up-and-down" vibrato on a normal note; what happens then?
This:
We bend the note up, and then back down to regular pitch. It never
goes below the pitch of the original note.
This means the average pitch of the note is this:
It's sharp! Even though we're going back to the original note, the average pitch of the vibrato is higher
, meaning it should sound out of tune!
So how do we make it sound like it is
in tune?
Here's how: by always holding the note for a little while before
adding vibrato
.
This lets your ear adjust to the correct pitch beforehand, meaning that when you start vibrating the note your brain is "tricked" into thinking it is the correct note - even though it is sharp.
If you add the vibrato straight away, it will
sound sharp. If you wait even a fraction of a second, though, then the listener's ear has a chance to register the correct pitch beforehand.
Then, when the note starts vibrating, it sounds as though it's the right pitch even though it isn't
.
It's a bit like cheating; the note isn't really
in tune, but because we've already played the right note, it sounds like it is.
How to Use Vibrato 2: Bringing it in
So now you know when to bring in the vibrato on a note.
There are basically two ways to bring it in, once you've given the listener's ear time to adjust to the correct pitch:
- Immediately go to the full width. This is what a lot of rock and blues players do, and it typically sounds "powerful". It can, however, be a bit startling because you're going from nothing straight into full vibrato - or "straight to eleven" as Nigel Tufnel would say.
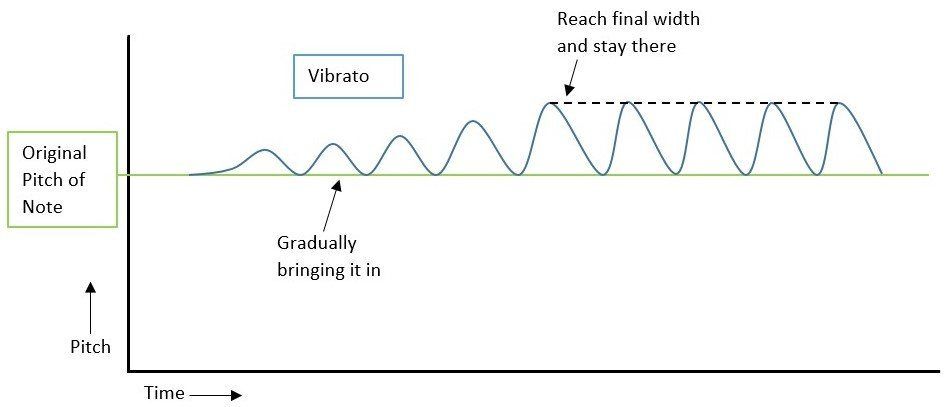
- Bring it in gradually. This is much more akin to a violinists approach, and it sounds more subtle. It breaks our "rule" of always going up to the same pitch, but as long as you go back down to the original note every time it will still sound in tune. This vibrato is great for a softer effect, and works really well as long as you do one thing: reach a width that you stick with . What I mean here is that it shouldn't just keep getting wider*, and Wider, and WIDER - it should get wider until it reaches a certain level, at which point you should keep it there for a little while. Remember, you're bringing in vibrato gradually, which means you should reach the final pitch at some point.
*By wider here, I mean wider in pitch. "Wider" means there's a bigger distance between the original note and the note you're bending up to.
As an example, here's a graph of what number 2 is like:
You could also increase the speed as you do the vibrato, and bring that
in as well as increasing the pitch. That's another cool thing, but it takes practice to make it sound good.
Before you try bringing it in gradually, I'd suggest learning a solid vibrato the "normal" way. Then you can learn to manipulate it and go into it in a more subtle way.
How to Use Vibrato 3: Making it Fit the Song
But what about making it fit the song?
After all, your skills are useless if you can't make them fit the context you're playing in.
There's a really easy way to learn this; it comes down to varying the pitch
and rhythm
.
You can do vibrato fast, for a more dramatic effect, or do it slow to make it sound more controlled. You can do it wide, to make it sound strong and powerful, or narrow, to make it sound soft and sensitive.
I like to use this easy chart to practice it; bottom left is more subtle, and top right is more powerful.
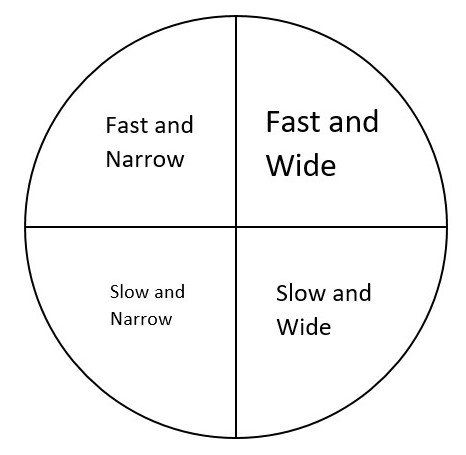
Put the chart in front of you when you practice, and try out the different vibratos there. Try them out over backing tracks or jamming over your favourite songs; what effect does each one have?
Remember that it's a spectrum - there's a whole range of widths and speeds you can use to create different sounds.
The best way to learn this is to play around with it, and try new ideas! Don't be afraid to do something unconventional (like a subtle vibrato over a metal song, or a wide/fast vibrato on a soft ballad), because that's often how you find your best ideas.
You can even use different vibratos in different parts of the same song or solo, to really spice things up! How about starting slow and narrow, gradually changing it throughout the song, before finishing on a big bend with wide, fast and intense vibrato?
Doing this is a great way to add emotion to your playing. After a while it becomes automatic, and you don't even think about what kind of vibrato you're using; you automatically use the right one for the job.
Who to Listen to: Five Awesome Examples of Amazing Vibrato
To finish up I'm gonna give you five great examples of vibrato done well.
Pay attention to the characteristics of each one - is it wide or narrow, slow or fast? Does it suddenly come in, or is it added to a note gradually?
1: Angus Young (AC/DC)
Who better to kick us off than the legendary Angus Young? His vibrato is quite quick and intense, adding aggression and power to his solos.
2. Roman Kim
I have chosen Roman Kim for this example, but any virtuoso violinists are worth listening to. This stuff is like a masterclass in jaw-dropping vibrato! Even if you don't normally listen to violin music, I urge you to check it out for the vibrato alone. Saxophone players are also great to listen to for this reason; Junior Walker is my personal favourite.
3. Zakk Wylde (Ozzy Osbourne)
Zakk's vibrato is famous for being incredibly wide and powerful; it suits his blues-y-metal-y style perfectly.
4. Yngwie Malmsteen
One of the things that separates Yngwie from all the copycats is the stuff in between the shred. His vibrato and phrasing are great, and his style is heavily influenced by classical violinists.
5. BB King
A great blues player with a really distinct vibrato; even if you're not into blues I urge you to check him out. Just listen to that tone!
Final Thoughts
So there we have it - the complete guide to vibrato! You now know all about the technique - how to perform it, how to master it, and how to use it.
Have fun, and keep rocking!