

Guitar Backing Tracks - The Ultimate Way to Master Soloing
Everybody loves guitar backing tracks - they’re a chance for you to practice your soloing, improve your improvisation and have fun playing loads of your favourite licks.
The problem is, sometimes we can’t find backing tracks that we like. They’re either too short, not the right genre or just plain crap! No good playing over a cheesy 80’s pop track if you’re a metal fan.
Ever been there? We certainly have. Trawling the internet trying to find a decent track to solo over, wasting precious practice time and getting more and more frustrated with every minute that goes by.
"No good playing over a cheesy 80's pop track if you're a metal fan"
The Ultimate Guide
That’s why we at TomGuitar have put together this awesome guide of 38 different backing tracks in different genres, including rock, blues, jazz and more. They’re all available for free on the internet and they’re all high quality tracks for you to have fun soloing over.
We’ve included the scales you need, advice on how to get the most from each track and even the length of each one so you can choose the perfect track, whether you’ve got two minutes to practice or two hours.
And there’s more – we’ve even put together a full guide on how to get the absolute most from these tracks, including a host of great soloing tips and advice. It’s all here – and in typical TomGuitar fashion, every single thing is 100% free.
Let’s get started!
Note: We’d strongly recommend adding this page to your favourites/bookmarks so you can come back to it whenever you feel like practising your soloing. That way, whenever you want to play something a little different this mega-guide is only one click away! It's a massive guide with tonnes of advice too, so you might want to spread out reading it over a few sessions.
You can check out the other TomGuitar Mega-Guides here!

Well, we’re going to give you our top 4 reasons you should play to backing tracks.
1. Integrating your skills together
There’s nothing worse than spending months learning a new technique or scale only to find that you can’t use it in context! You might have spent eight weeks learning a cool new sweep picking lick, but whenever you try to use it in your solos you might find that it sounds like it’s been forced in there, rather than sounding like a natural part of the solo.
The problem is that you haven’t spent time integrating it with your other skills. It can take time to get used to using the new pattern in a real playing context; it’s one thing to play the lick, and a whole new skill (and an often neglected one at that) to actually use it tastefully.
"Using your skills tastefully is a whole new skill"
Improvising over backing tracks is a superb way to remedy this problem. By deliberately pushing the new concepts and licks into your solos when you improvise, you’ll find out when they work, and more importantly: when they don’t!
You’ll learn to integrate the new with the old so that you don’t have to think about it anymore; all of your skills will automatically be right where you need them. You’ll finally be able to make use of all the things you’ve practised, and instead of being lots of individual skills, they’ll form together into one complete soloing system.
Pretty cool, right?

Integrate your skills into one complete system
2. Improving Improvisation Skills
This is pretty obvious – the more you practice improvisation, the better you’ll get at it, right? Correct. But why should you bother?
The ability to improvise (i.e. create new music on the spot) is a skill that every musician should have. It enables you to quickly come up with new passages and melodies (a vital skill in song writing), and will also come in very handy when jamming with other musicians.
If you’re a blues or jazz player then this becomes even more important, because much of the music played in those genres is improvised. Improvisation is like the ultimate test of a musician’s skills; it combines technique, aural skills, theory knowledge, creativity and more, and is not only a good way to test these skills but also a good way to develop them.
In short, it’s vital!
"Improvisation is the ultimate test of a musician's skills"
3. Improving Melody Writing
Every time you ad-lib a solo, what you’re really doing is coming up with a continuous, long, flowing melody line. This means that if you want to be able to write good melody lines, you need to practice your improvisation!
If you’re a budding songwriter, then this is vital; as everyone knows, the melody is one of the most important parts of a song. By improvising over a few backing tracks each day, you’ll be coming up with new melody lines all the time – vastly improving your skills.
"If you want to write good melodies, being able to improvise is a huge advantage"
Obviously not all melodies in guitar solos will be suitable for singing in the chorus of a song, but that’s not the point. The point isn’t to use some of your improvised melodies in songs (although you can of course do that if you like!), it’s to practice coming up with melodies immediately and on-the-spot so that when you sit down to write a melody for a song, you’ll have a much better chance of writing something great because you’ve already practised it a thousand times.
The more stuff you write (or improvise – because that’s just writing on the spot) the better you’ll get at writing!
4. Improving Your Solo Writing
If you’re someone who’s struggled to write solos for your band, then improvising is something you should definitely do more of. Sitting down and writing a solo is one thing, but if you practice writing solos on the spot (i.e. improvising) then your skills will improve much, much faster.
Having a track on in the background and freely trying out ideas over it is an awesome way to improve your soloing skills. After all, if you get to the stage where you can ad-lib cool solos on the spot, the ones you write will be even better! You can take all of the coolest ideas from your best improvisations and whack them all together to form one awesome guitar solo.
"Take all of the coolest ideas from your improvisations and form one awesome solo"
You’ll not only be able to write better solos than before, you’ll also be able to write them much quicker, too. Instead of spending hours deciding which notes to play and how to play them, you can just improvise over the track a few times and you’ll have great ideas right at your fingertips.
What could be better?
BONUS: Developing Your Aural Skills
Yes, I know we said “Top 4 Reasons”, but this one is so often overlooked that we just had to include it as a bonus.
As far as musicians go, we electric guitar players are probably some of the worst at training our ears. People think “whatever, why should I bother with ear training when I can just get the tab for a song anyway?” The convenience of online tab websites mean that we seldom need to use our ears to figure anything out.

Ear training, though, is one of the absolute BEST things you can do to improve your abilities as a player. When you get good enough you’ll be able to:
• Figure out how to play songs just by listening to them, even without a guitar in your hands.
• Write music in your head without a guitar, and know exactly how it’ll sound when you play it. You can write music while you drive, sit at your work desk, etc.
• Write better songs, melodies and guitar parts.
• Know exactly how each and every note on the fret-board will sound BEFORE you play it. That’s right – you’ll never play “wrong” notes again, because you’ll know exactly how something will sound even before your fingers find the notes. Yes, this is possible even if you currently think you’re “tone-deaf”.
"Ear training is one of the best things you can do to improve your abilities as a player"
There are loads of ear training courses out there (many of them very good), but one thing you can do right now to improve your ear is… you guessed it – improvise over a backing track!
It gives you free reign to experiment with the sounds of different notes, licks and chords, all while jamming with other musicians (even if they aren’t in the same room with you). The more you do it, the more your subconscious mind will get used to the sounds of different notes, and the better you’ll be at all of the skills in the list above.
In fact, I’ve found improvisation to be better for improving my ear than anything else – including conventional aural training exercises.
Give it a try, and see how much your inner ear will improve with just a little bit of ad-lib soloing.

1. You’re not playing OVER the track; you’re playing WITH it!
This is by far the most important piece of advice in this whole guide. Yes, you’re playing a solo, but don’t just shred over every other instrument in the track.
Instead, try to play things that complement the other instruments rather than obscure them. Is there a really cool bass run at the end of every verse? Then pause for a moment to let it shine, or play a similar thing on the guitar to emphasise it. Can you blend in with the music and make it sound as though your guitar was there all along?
"Can you blend in with the music?"
Basically, you should treat the backing track as if you were playing with real musicians. You’d get annoyed if the singer started wailing over your guitar solo, so don’t do the same when you play over a backing track. Sure, there’s no-one there to get annoyed, but that’s not the point; you’re preparing yourself for when you do play with other musicians.

Imagine you're jamming with real people in a band
This will teach you so many skills – it really is vital! If you’re in a band (or ever want to be) then this is even more important. It will make you a much better player, and is a superb way to change your backing track practice from “soloing time” to “well-rounded musician” time.
Remember: you’re not playing OVER the track, you’re playing WITH it.
2. Play in unfamiliar styles
This is something that most musicians don’t do enough of. If you’re a rock player, try playing over one of the jazz tracks; if you normally play funk, try one of the metal tracks. Don’t limit yourself to just the genres that you’re comfortable with.
Playing different genres is a great thing to do. It forces you to play differently to how you normally would and get out of your normal habits. In fact, we’d even go as far to say that it’s the No.1 way to get out of a soloing rut.
"Playing in new styles is the No.1 way to get out of a soloing rut"
Do you find yourself constantly playing the same phrases over and over? Does it start to sound stale? Then you HAVE to try out some new genres! It’ll change the way you approach note choice, phrasing and technique, and if you do it regularly then you’ll start to develop your own unique playing style.
And another thing – just because you’re playing with a funk track, for example, it doesn’t mean that you have to play funk guitar. Try out some blues licks, or even some metal shred picking! Then, try out funk rhythms over a blues track.
Experiment. Have fun with it, and see what different sounds you can come up with.
3. Use different tones
This is an extension of the last point. Just because you’re playing with a metal backing it doesn’t mean you always have to use a heavy, distorted tone. What happens if you use a clean sound?
Sure, it might sound weird and a bit strange at first, but you’d be surprised what you can come up with. Don’t constrain yourself; how about adding a load of chorus and delay to that blues lead tone to make something ethereal, or creating a sharp, treble-y sound and using it over a jazz track (where smoother tones are normally used)?
"There are no mistakes when you're improvising - only new ideas"
The overall message here is to experiment and not be held back by the constraints of what you’re “supposed” to do. Instead, ask yourself “hmm, what do people normally do?” and then do the opposite! It doesn’t matter if what you come up with sounds rubbish – there are no mistakes when you do this. It’s all for fun, and if you come up with ten rubbish ideas and one great one then you’ve succeeded – you’ve discovered a new, unique sound!
Don’t be afraid to experiment, and never be afraid of making mistakes.

4. Develop a Theme
Now we’ll move on to some more specific soloing advice. Whenever you’re doing a solo, it’s important to give it some sense of structure; whether it’s a short four-bar interlude or a full 2-minute long epic, you’ll always need to give your solo the sense that it goes somewhere.
So how exactly do you do this? Well, it all comes down to developing a theme. Instead of cramming it full of different licks and techniques, start with just one lick or phrase consisting of a few notes. Then, leave a little pause before playing the same thing but with a little variation; you could add in a bend somewhere, or finish the phrase on a different note. Continue to embellish and expand on the one idea and you’d be surprised how professional it can sound.
"You always need to give your solo a sense that it goes somewhere"
This is a very basic example of what’s called “call and response” – that is, one phrase is the “call” and you “respond” to that with a similar (but slightly different) phrase. It’s much more effective to compose a solo around this idea than it is to simply cram in a load of random ideas.
This doesn’t mean that you have to keep everything very simple and structured though – you can still have fun with lots of different licks! Just try using this concept to bring your solo together, perhaps by starting on a certain phrase, going to different ideas and then coming back to that same phrase again at the end.
5. Impose limits on yourself
This is great for developing your creativity. Instead of letting yourself use the whole neck, how about limiting it to just one position? You could take it even further - how about just three or four notes for the entire solo?
See how much you can do with just a few notes
What does this teach you? Well, there’s two things. First, it teaches you that you don’t need to play complex patterns or shapes to sound good; you can play great-sounding licks with only a few simple notes. Second, it teaches you to experiment with phrasing and rhythmic variety, instead of just changing up the notes.
The end goal isn’t to play full solos just using a few notes – this a practice method, not a soloing method. The end goal is to make your normal solos sound more creative and melodic, no matter how many notes you decide to use.
Try this exercise for just one week and you’d be surprised how much better you become!

6. Play, play, play!
This is something that so many guitar players forget, and yet it’s completely obvious. No matter how many articles you read or videos you watch, you’re never going to get any better unless you actually play!
Some of these backing tracks are very short – try just jamming to a 2-3 minute one acoustically before you go to school/work. Then, when you get home you could probably fit in another five minute session. How about after dinner? Maybe you could try out one of the longer tracks.
The point is that if you really want to get progress, you need to play a lot. This is obvious, but it’s often easier to just watch another free lesson video than actually get out a guitar and try to learn something. You DO have enough time – just do it!

We’ve divided the tracks into four areas: blues, rock, metal and jazz/funk. There are plenty of little variations and styles within those categories too – so don’t think that all the blues tracks will be the same!
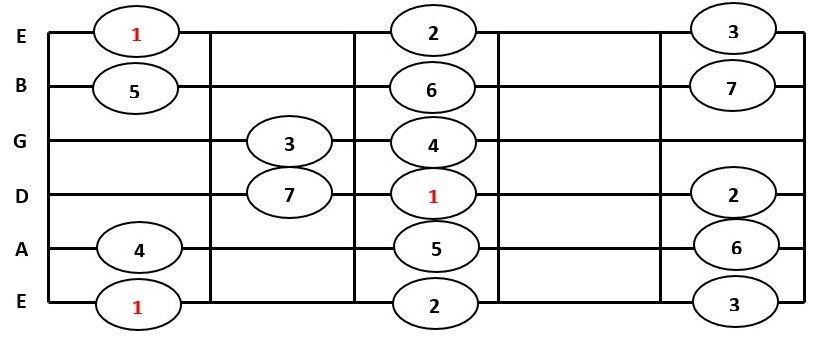
With each track we've written which key its in, the length, a few tips on how to use it well, and which scales to use. Below we've given you some basic scale patterns that'll allow you to play over any of the tracks in this list. It's not intended to be a complete list of all the scales you could use, or anything like that - just a few basic patterns for the beginners among you.
Pick a scale pattern and then line up the "1" on the low E string with the note that corresponds to the key you're playing in (as shown in the chart). For instance, if you're playing in B Dorian then line up the "1" in the Dorian scale pattern with fret 7 on the low E string, and away you go!
The numbers are the scale tones - if you don't know what they are then ignore them; just remember that the 1 is your root note, so if you're playing in A, for example, then note 1 is A (so line up note 1 with the 5th fret of the low E string, as shown below).

This is the major scale - the basis of all other scales:
And now the major pentatonic scale, which is just a major scale with a few notes taken out:

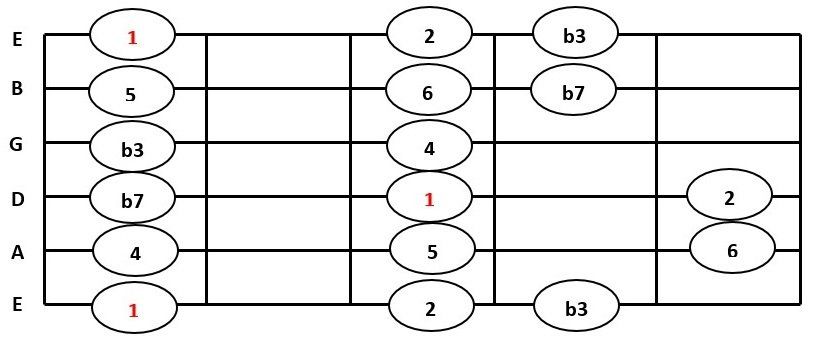
Next is the minor scale shape:

And now we have the minor pentatonic scale - which is just a minor scale with a few notes taken out:

This is the "Dorian" scale. The Dorian scale is just a variation on the minor scale. Notice how only one note (the 6th note in each octave) has changed. Technically it is a “mode” of the regular minor scale, but if you’re new to theory then don’t worry about that – just think of it as a minor scale with one note changed!
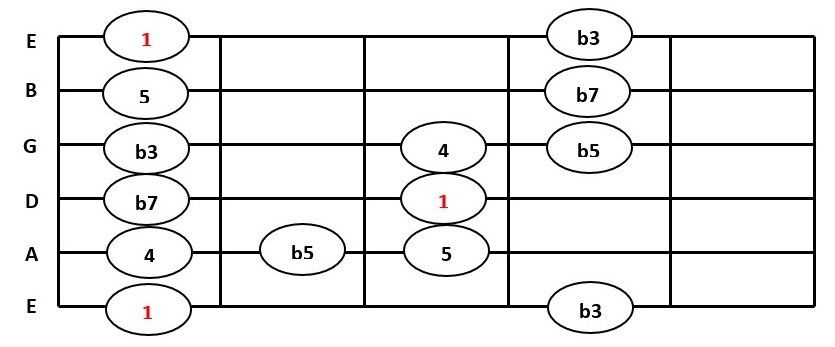
The last one here is a blues scale, which you can think of as a minor pentatonic scale with an extra note.
Blues
Blues Tips
1. Experiment with bending
Try bending from every single different note in the scale, and see what they sound like. Most people only bend a few select notes in the scale, but try them all out and you’ll quickly start to open up new possibilities for yourself.
2. Leave gaps
Every time you play a phrase, pause afterwards before continuing. Wait… then wait some more. Wait until it feels like you REALLY HAVE to play something again… and then wait just a little bit longer. THEN play the next phrase.
Leave gaps far longer than you think you should, and you’ll sound really professional. Of course, sometimes you’ll want to play more (for instance, for an intense build-up at the end of a solo) and that’s great, but in blues, it’s all about the notes you DON’T play.
3. Keep it simple
Can you stick to just three notes and make it sound great? How about taking one little phrase and using it for the basis of an entire solo over one of these tracks?
The more constraints you give yourself, the more creative you have to be and the more direction you’ll have. Don’t try to use every single note in every single scale pattern all over the neck; instead, stick to simple, solid ideas.
1
Key: Am
Length: 21.19
Scales: Am, A minor pentatonic or A blues.
This first one is a nice and smooth track with the occasional organ lick for you to play around with. It’s over 20 minutes long, so it’s great for those long, drawn-out improvisation sessions! It builds up nicely throughout for variety.
2
Key: Am
Length: 11.50
Scales: Am, A minor pentatonic or A blues.
This one is shorter at just over 10 mins, so there’s lots of time to develop a theme and experiment with ideas. It’s quite funky, too – the rhythm of your licks will be really important when playing over this track!
3
Key: E
Length: 5.24
Scales: E major, E minor pentatonic, E major pentatonic, E blues.
There’s a major feel this time, and it sounds much more upbeat and energetic. This backing track is great for practising your fast blues licks over. It features a very standard “twelve bar blues” progression for the most part, but with a nice turnaround. The chords are displayed on the screen as you play, too!
4
Key: G
Length: 5.28
Scales: E major, E minor pentatonic, E major pentatonic, E blues.
There’s a very cool emphasis on the bass guitar in this track. Try blending the major and minor pentatonic scale patterns together on this for some nice sounds.
5
Key: C
Length: 22.40
Scales: C major, C minor pentatonic, C major pentatonic, C blues.
This one is nice and slow, making it a great opportunity to put blues tip number 2 into practice! If you get into the habit of jamming over this (or one of the other longer tracks) every day, your blues playing will improve in no time.
6
Key: G
Length: 5.30
Scales: G major, G minor pentatonic, G major pentatonic, G blues.
A very upbeat, fast blues track that has nice variations in dynamics. It’s got some nice guitar work in the background, so see if you can come up with parts that complement the existing guitar lines rather than obscure them.
7
Key: E
Length: 12.02
Scales: E minor pentatonic, E blues, E major pentatonic.
A great track with a real Texas blues feel, this one is reminiscent of Albert Collins and Stevie Ray Vaughan. See if you can figure out the riff by ear.
8
Key: E
Length: 5.48
Scales: E minor pentatonic, E blues, E major pentatonic.
This is an SRV style track with a laid back style. See if you can write a riff to play over this one instead of soloing over the whole thing – improvising rhythm parts can be just as fun as improvising lead!
9
Key: E
Length: 3.45
Scales: E minor pentatonic, E blues, E major pentatonic.
This is a cool track with a heavy beat. It’s great for playing aggressively!
10
Key: E
Length: 12.35
Scales: E minor pentatonic, E blues, E major pentatonic.
This track is great because it features some examples of what you could play at the beginning. It’s a nice shuffle pattern that features some subtle but cool variations throughout. Have fun with it!
Rock
Rock Tips
1. Experiment with speed
Experiment with the speed that you play at; don’t play fast all the time, but don’t play slow all the time either. Instead, try changing between slow and fast throughout your solo for more variety.
Starting off slow and then getting faster towards the end of a solo is a great way to build up to a climatic end, and give your solo a sense of structure.
2. Build a melody
Focus on building up a melody – if you’re writing a song for a band, for instance, treat your solo as another melodic section of the song rather than just a chance to show off your skills. Practice this with the backing tracks – see if you can compose melodies over one of the tracks that make it sound like a real song rather than an extended solo.
To practice this you could try figuring out the vocal melodies of your favourite songs on guitar – that’s right, play the vocal parts, but on guitar! It’s a great way to get used to composing great melodies and not just all-out shred-fests.
1
Key: Gm
Length: 4.45
Scales: G minor pentatonic, G minor.
This one is a simple track with lots of subtle changes in the background to keep it interesting. It has a nice structure with clearly defined “verses” and “choruses”, making it great for trying out tip number 2 above.
2
Key: Em
Length: 4.13
Scales: E minor, E minor pentatonic.
This is a very melodic track, and one of my personal favourites from the list. There are a few different sections to this track that allow you to try out different ideas – some soft and slow, some hard and fast.
3
Key: Am
Length: 4.27
Scales: A minor, A minor pentatonic
The next track on the list is reminiscent of Jimmy Page and Stairway to Heaven; it’s great fun to jam over! Try learning some Jimmy Page licks and playing them over this. Then, see what variations you can come up with to make the licks your own.
4
Key: Am
Length: 4.38
Scales: A minor, A minor pentatonic
Now for some classic 80’s rock! Notice how in this track, the rhythm guitar and bass follow each other very closely – see if you can do the same with your lead guitar by basing your melody off the riff (perhaps simply by playing the riff in a higher octave). This will create a really heavy, powerful sound.
5
Key: Dm
Length: 5.28
Scales: D minor, D minor pentatonic
This is quite a heavy track, but one that’s got a lot of melodic elements. Try playing the arpeggios of the chords in the bridge of the track for a nice melodic effect.
6
Key: Dm
Length: 5.49
Scales: D minor pentatonic, D minor
Although the guitar in the background is only lightly overdriven, I find that a very heavy tone works well over this song – especially when it builds up in the section starting at 1.28.
7
Key: Am
Length: 6.35
Scales: A minor, A minor pentatonic
Full of attitude, this track is great for practising your phrasing. The staccato chords in one section give a particularly interesting sound that you could try to emulate in your lead playing – how about playing staccato double stops high up the neck to help emphasise the beat?
8
Key: Bm
Length: 5.04
Scales: B minor, B minor pentatonic
Ever wanted to sound like David Gilmour? Well, this track features a very Pink Floyd-esque chord progression that’s ideal for those slow, emotional bends. Even if Pink Floyd aren’t usually your thing, still try out this track – the more you jam over it the more fun it becomes!
9
Key: Am
Length: 5.10
Scales: A minor, A minor pentatonic
This one is a ballad-style song, with some nice effects on the guitar in the background and a really nice build-up throughout. My advice would be to start off with slow, sparse licks and build up to more complex and aggressive stuff as the track progresses. This will give your solo a sense of structure that makes it sound much better.

Hard Rock/Metal
Metal Tips
1. Don’t go over-the-top
As tempting as it is to shred the whole way through these songs, make sure you also leave some gaps and play some slower, more melodic phrases. This will not only add variety but will also make your shred licks stand out more, making them sound even better!
2. Keep it clean
Make sure your technique is clean. When you’re playing with lots of distortion (which you mostly will be on these songs) it becomes even more important than usual to play with good, clean technique.
Don’t just focus on playing the notes you intend to play – also make sure that the other strings aren’t ringing out, because if they are then your solo will sound amateurish and unprofessional.
1
Key: Am
Length: 5.02
Scales: A minor, A minor pentatonic
What I love about this track is the intro – it builds up steadily until the full song kicks in, giving it loads of impact. There are also a few clean sections in this which break up the heavy riffs and make the rhythm guitar sound even more powerful when it comes back in. See if you can replicate this structure with your solo, playing softer and slower in some sections and then whacking up the aggression in others. Have fun with this one; it’s great!
2
Key: Em
Length: 9.36
Scales: E minor
This is a great one that’s perfect for practising melodic metal playing. There’s lots of rhythmic variety (including stops and starts) in here which forces you to experiment with ideas that you may not otherwise have come across; it’s great for developing your creativity.
3
Key: Am
Length: 4.39
Scales: A minor, A minor pentatonic
This is less “dark” than the other metal tracks, and is more of a hard rock song. I find that arpeggios work particularly well over this track, so try playing the notes of the chords separately and see if you can come up with some cool melodies.
4
Key: Dm
Length: 5.06
Scales: D minor
This is a nice backing track at a moderate tempo, with some pretty cool features; the drums in particular sound very good compared to most other tracks. If you want a really professional-sounding backing, this is the one for you.
5
Key: Em
Length: 5.12
Scales: E minor, E minor pentatonic
With a straight forward and punchy rhythm, this song is great for practising your fast shred licks. The riff is very cool – try figuring it out by ear and playing along with it!
6
Key: Am
Length: 9.41
Scales: A minor, A minor pentatonic
Here we’ve got some alternative metal. This song is a bit slower than the others which makes it nice if you’re not used to fast playing yet. I especially like this one for practising playing melodically.
7
Key: Am
Length: 3.37
Scales: A minor, A minor pentatonic
This is a much shorter track, with some awesome riffs! The part starting at 0.32 (which repeats throughout the song) is superb for playing slow melodies, while the rest of the song really suits some fast shredding. It’s a great way to put metal tip number 1 into practice!
8
Key: Am
Length: 2.31
Scales: A minor, A minor pentatonic
This one is another short track, but don’t let that put you off! It’s still worthy of a few jam sessions. The progression is pretty simple, so see if you can figure it out by ear; it’s a great way of improving your aural skills.
9
Key: Am
Length: 4.47
Scales: A minor, A minor pentatonic, A blues.
This track is full of groove, with a heavy, grinding rhythm. Try combining the minor and blues scales together for some particularly nice sounds over this one.
10
Key: Am
Length: 6.27
Scales: A minor
If you’ve brushed up on your theory then try out the A harmonic minor scale for this track. It’s a neoclassical metal jam reminiscent of players like Yngwie Malmsteen and Vinnie Moore, and it’s superb for fast shred licks like sweep picking arpeggios.

Jazz/Funk
Jazz/Funk Tips
1. Remember the rhythm
Remember that the rhythm of your notes is just as important as the notes themselves. This is especially true in the funk-style backing tracks. If you want to practice your rhythmic ability, try sticking to just one note or small chord shape (on 2-3 strings) and seeing how interesting you can make it sound.
Do this for a week and before you know it your rhythm will have improved dramatically!
2. Outside notes
Don’t be afraid to experiment with “outside” notes – those that aren’t actually in the scale. Using them will create tension which you can then release by going back to scale notes again – creating a sense of structure and making your solo “tell a story”.
3. Arpeggios
Use arpeggios. Analyse the chord progressions in the songs and then try using the notes in the chord as solo notes. This is a great way of making your solo sound more professional and pre-composed, as the solo you play will follow the backing track closely.
1
Key: Dm
Length: 12.39
Scales: D Dorian, D minor pentatonic.
This is a really funky track with some killer bass lines. It’s even got an example at the beginning of someone jamming over the track, so you can get some cool ideas for your own licks. Try it out!
2
Key: Fm
Length: 6.40
Scales: F minor.
If you’re a fan of smooth jazz, this is the track for you. It features all of the chords on the video (going past as the track progresses) so it’s great for practising your arpeggios. I’d recommend figuring out some arpeggio shapes for the chords beforehand, and then jamming over the track and slotting them in when you think it’ll sound good; before you know it, using the arpeggios in your solos will be second nature.
3
Key: C Dorian
Length: 4.36
Scales: C Dorian.
I’d recommend giving this track a full listen before you play over it, simply to hear the cool trade-offs between the piano and bass. It can be quite challenging to add to a track like this in a tasteful way without just soloing over the whole thing; try treating your guitar part as another part of the backing rather than as a solo and see what ideas you come up with. The change in approach from “I’m doing a solo” to “I’m adding to the song in a tasteful way” is very powerful, and it’s a skill you’ll need to develop if you want to be in a successful band.
4
Key: Am
Length: 4.35
Scales: A minor, A minor pentatonic.
This track is very funky and light for the most part, but there are a few heavier sections that kick in part way through. In those parts I like to kick in the overdrive and play aggressive blues and rock licks before going back to a clean tone in the “verse”. You could even try it the other way round – remember, the more you experiment, the better you’ll be!
5
Key: D Dorian
Length: 4.14
Scales: D Dorian.
This track is one of my favourites on the list – just listen to how funky it is! I like to use it for practising rhythm improvisation rather than lead; the groove of the track makes it great for learning to “play in the pocket” and develop a tight rhythm style. Even if you’re not usually into funk, I beg you to try this out – you won’t regret it!
6
Key: Cm
Length: 6.29
Scales: C minor, C Dorian, C minor pentatonic.
To me this track is the perfect fusion between funk and jazz – it’s smooth, but at the same time it has an addictive groove. I’d actually recommend this for rock players more than anyone – have a few jams over this and you’ll be out of the “pentatonic rock lick” rut in no time!
7
Key: Am
Length: 6.19
Scales: A minor, A dorian.
This is a more advanced example, but even if you’re new to improvisation you can still have a go at it. Try to follow the chords as closely as you can.
8
Key: Am
Length: 3.58
Scales: A minor, A minor pentatonic.
This is a Guthrie Govan style jazz-funk track with loads of groove. It’s a great opportunity to put jazz/funk tip number 1 into practice – the rhythm of your notes is hugely important when soloing over something like this!
9
Key: Em
Length: 6.55
Scales: E minor, E minor pentatonic
Just LISTEN to the bass in this track – funky as hell! This one is perfect for practising your funk rhythms, and combining them with some smooth jazzy lead lines for variety.
More Great Content
If you’ve enjoyed this Mega-Guide then check out our other great lessons (all free, of course) at the blog!
Note: We didn’t create any of these tracks; we’ve compiled them here as a list (with lots of advice and tips) so that you can come back here for easy reference any time you feel like soloing over something new. All of the creators are shown when you click on the respective link.